I am going to begin to move on to actually painting these trees we have been
dissecting. I use the word
dissecting because what I have been writing about is tree anatomy. In the comments we have discussed a book written in the early 20
th century by an artist named Rex
Vicat Cole called "The Artistic Anatomy of Trees". I learned a lot there, if there were a bibliography for this series of posts, Cole would be at the top. It is not easily read though and goes into a lot of detail that is extraneous.
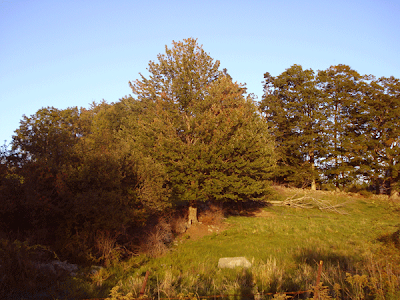
Here is a grouping of trees that we might set up to paint. Below is the same group of trees with the general lines indicated.
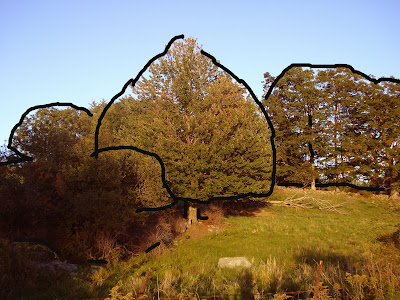
In order
to get this scene onto my canvas I would draw their outlines something like this. There are about five big shapes there. One of the reasons this scene is
attractive is because each of those areas is a
different size and shape. As the artist trying to get the picture up and running I need to plan out the simplest "blueprint" of my shapes I can. Now,I drew these lines on the picture with
photoshop, which is for me a pretty clumsy affair. If I were working in paint on canvas the lines would be softer. Theses lines look a little like coat hangers, but I think you get the idea. This is a summary, here's another.
Above is the scene and below are the summary lines that
would start a block in of the painting. These lines are merely the greatest simplification of where the landscape is and carry the least amount of detail. The details of the edges of the forms are averaged or rounded off. However if you can get this much information onto your
canvas you are well on your way to "taming" a scene like this.
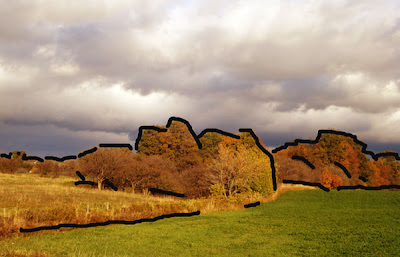
Below is the same photo with a few more lines on it. They show the larger " hidden" lines in the forms. You want to look for these and lightly indicate them.
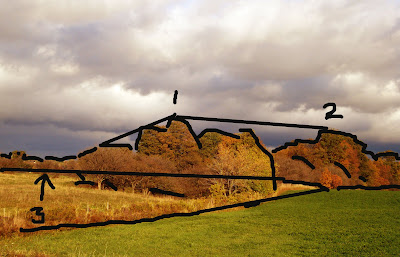
Notice the relationship between 1 and 2,
by finding that line between the two and checking
its angle you find a lot about about their placement. Look at
line 3, see what happens if you imagine it running behind that central group of trees and emerging on the other side. Notice where it would intersect that foreground diagonal were that extended. These continuation of existing lines show relationships between different objects in the scene. Look for them. It is a helpful way to avoid working piecemeal, which is where you have everything on the canvas, but not in its right relationship to everything else. This is a geometric measuring system.
 Here is a grouping of trees that we might set up to paint. Below is the same group of trees with the general lines indicated.
 In order to get this scene onto my canvas I would draw their outlines something like this. There are about five big shapes there. One of the reasons this scene is attractive is because each of those areas is a different size and shape. As the artist trying to get the picture up and running I need to plan out the simplest "blueprint" of my shapes I can. Now,I drew these lines on the picture with photoshop, which is for me a pretty clumsy affair. If I were working in paint on canvas the lines would be softer. Theses lines look a little like coat hangers, but I think you get the idea. This is a summary, here's another.
 Above is the scene and below are the summary lines that would start a block in of the painting. These lines are merely the greatest simplification of where the landscape is and carry the least amount of detail. The details of the edges of the forms are averaged or rounded off. However if you can get this much information onto your canvas you are well on your way to "taming" a scene like this.
 Below is the same photo with a few more lines on it. They show the larger " hidden" lines in the forms. You want to look for these and lightly indicate them.
 Notice the relationship between 1 and 2, by finding that line between the two and checking its angle you find a lot about about their placement. Look at line 3, see what happens if you imagine it running behind that central group of trees and emerging on the other side. Notice where it would intersect that foreground diagonal were that extended. These continuation of existing lines show relationships between different objects in the scene. Look for them. It is a helpful way to avoid working piecemeal, which is where you have everything on the canvas, but not in its right relationship to everything else. This is a geometric measuring system.


14 comments:
Stape, I couldn't resist a comment-less post where I get to go first. I'm glad you are writing about this. I find that one of the biggest humps to get students over is seeing the big shapes and simplifying forms. For me the averaging of details along the edge is exciting and artful. Loomis does a good job explaining it in "Creative Illustration", too.
Stapleton, Those bounding lines for me are doing something else , they are creating the design structure in the painting. The shape in the bottom one is a z and the first one (which you didn't place the land surface lines) shows a vital intersection as well. I put those lines in first when I 'm painting then put in the shapes on those lines.
My new pac boots have arrived at Cabelas today - I'm happy , I used my old boots so much I had holes clear thru the bottoms - I can poke my finger in and touch the liner.
Robert glad you got to go first ! Why don't you fly up and come up to snow camp? You can ride up with me.
Heck, Mary, I should. I doubt it would be too much colder than it is here. It was 33 degrees when I got up at 5:30AM. Never got above 43 yesterday. Unusual for us.
But as much as I'd love to take part I think I'd rather save those frequent flier miles for snowboarding in Colorado.
awesome post- simplified thinking about tackling a problem. I think my new mantra this year is dont make it harder than it is- You have cleared my cobwebs on this subject!
Simone:
I had no idea you couldn't ski.Take Marys advice and come on up and I will teach you that too!
.................Stape
I have resorted to printing each of your posts on trees. With this one I tried to draw lines for the second pictures and again did not simplify enough. The angle lines were a great idea. Will implement that. Thanks Honor
LOL! For the record, I do ski...it's just that the water I ski on is usually around 75 degrees and not in a crystallized state. Riding is better for those of us who visit snow one or twice a year. Fewer moving parts!
Thank you Stapleton,for another great post. I have not tried using the hidden lines in my landscapes, but I will now! If one wants to find the different tree shapes, most pocket tree guides give you these, (minus the leaves). Most helpful for identifying in winter time.
We are on day 20 of snow still in the yard...however it 52 today. I took advantage of this and painted snow! It was not too painful as I painted looking out the window of the "Stu-op" Looking forward to the segment on conifers.
barbara b.
Stape, this is where I need to shut-up and watch.
(and if you low blow me with a cheer, well you won't be the first)
Mary:
Gotta have decent boots.
...Stape
Honor:
I think there is at least one reader who has printed out the entire blog.
......Stape
Barbara
Whats a stu-op?
.................Stape
Bill.
No low blow, go with the flow, bro.
How now to draw bough?
need a Peavey?
.........Stape
tlwest;
On this here blog we don't do them fancy mantra's, we do neck tattoos. That's a whole nother level of commitment
..............Stape
Post a Comment