Tuesday, March 30, 2010

Wave anatomy and its importance to the seascape painter in the determination of form in light and the ramifications thereof, plus additional material

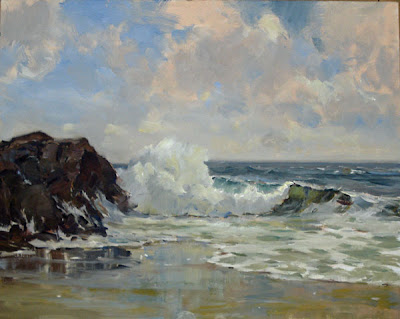
Above is a breaker, I shot a lot of them to get one this perfect. It is almost the ideal wave. I am going to begin talking about the anatomy of a wave by referring you to your John Carlson book. It IS the text for this blog, I guess. In the book he talks about the law of consequent angles.
For those of you who don't know about that, it is a system for understanding the values before us in a landscape, depending upon the angle the various planes present to the sky, or light source. Something that sticks up from the ground or surface like a wall, presents no planes to the light and is therefore darkest in value . The surface of the earth or water presents all of itself to the light, like a floor and therefore is high in value. Planes that are slanting upwards like ramps from the "floor" receive more light depending upon their consequent angles to the light. If you have Carlsons book reread the chapter on this again, it will help you through the understanding of that which is to follow in the coming posts.

The technique of painting waves and seascape requires understanding how the surface anatomy turns their form toward or away from the light. A seascape painter uses the anatomical knowledge of how waves are shaped to know which way EVERY plane on their surface is facing. This combined with knowledge from observation of the water itself enables the seascape painter to invent the surf. There are many planes, perhaps dozens in a wave. In order to paint them you need to know which way they are all facing. To make this even more complex, most of them are mirrors.

AS an example, look over at the left hand side of that wave, to the left of the break. There are two major value areas there. They are the upright "wave: forms that rise like walls, and the top planes that "ramp' upwards and reflect the sky. All over the body of the wave and the surface of the water similar planes are doing the same thing, many of them are pointed like mountains, in fact the up planes in a wave tend to resemble mountain ranges. Notice the "floor" in front of the wave, it is of a higher key than the rising planes of the front of the wave and below the foam of the wave it's mirror like quality is displayed. These are the sort of things that I will be discussing in the upcoming posts, as I lay out in a hopefully orderly fashion the structure of the parts of an ideal wave.

I received an e-mail today from the Old Lyme Art Association saying that the lower level of their historic building, containing their studios, has been flooded. The building is close to the Lieutenant river which must be very high. Those of you outside New England may be unaware that we have had, and continue to receive record rainfall amounts. Boston is in a state of emergency with the National Guard called out. I am supposed to deliver a painting for a show at the Guild tomorrow, I hope I can get there.
Reproduced below is their e- mail to me;


Dear Members, Students and Friends,

The Lyme Art Association has suffered significant flood damage from this week's rain, and the downstairs studio will be closed through the week. Any classes scheduled this week are CANCELED unless you hear otherwise from us.

Both downstairs computers have been damaged in the flood. They held important Education databases and class rosters. If you have registered for a class this spring, please help us by calling the LAA between 10am and 5pm and giving us your enrollment information again. Please be patient if you get a busy signal - we only have 2 phone lines.


We will not be able to respond to your emails as our wireless server was also destroyed.

Thank you in advance for your patience and support as we recover from this disaster. Our upstairs galleries did not suffer any water damage and will be open all week.

With kindest regards,

Susan Ballek
Executive Director


Beware of Beaks

Above is a view I shot at Cathedral ledges in Rockport Massachusetts yesterday. Skin divers come here to drown. I lived about a block away from here for several years and they were forever being lost off this shore. I show this view to describe another point of view problem, THE BEAK!

In a verbal description this sounds like a great view, and in a way it is. BUT it has a big problem. That pointy shape of the distance makes for a lousey design. Yes, there are some Hudson river paintings that successfully use beaks, but it is still good to be forewarned.When you paint along the shore you see beaks everywhere. It is possible to finesse a beak in a painting by arranging the water to downplay it, say, with streaks of foam, but generally in seascape painting they are an enemy waiting to pounce on your design. You might get away with one in a show, but a whole roomful of them would be like a cutlery store fired at you from a canon.

The beak above is dangerously symmetrical top and bottom also. Notice also that the shape of the water below repeats that of the beak above. Truly evil! When I painted for years up on the coast of Maine, over and over I would make paintings with beaks in them and then one day I had had it and I swore I would never paint another beak.

Here is a wave I shot the other day at Halibut point, tomorrow I will begin pointing out some of its anatomy.

Monday, March 29, 2010

Down at the waterline

Above is an example of a seascape painting that is not down in a hole. This is by Frederick Waugh, who was Americas finest seascape painter. He painted scads of them, and was enormously successful. He is not as well known today except among lovers of seascape painting. I will use him as an example often during the upcoming lessons on the subject.

Even if this place existed ( it is probably constructed from bits and pieces of real places that Waugh combined in his imagination) you couldn't set up this low on the waterline without the waves rearranging your equipment every twenty seconds or so. There are some very important advantages to this level's view though. Some of them are.
  • Like receding "flats" in a theater set, the objects sit one in front of another, and step back at an oblique angle into the picture plane. This groups the forms and gives great potential for showing how those forms recede.
  • It eliminates the great desert of water above the surf and below the horizon that has little going on in it of interest and is always a problem to paint.
  • It allows the artist to show the front side, the business end of the wave. When looking down on waves, their backs appear, the backs of waves are not very useful in portraying the oncoming waves, although glimpses of them do reveal the forms of the wave..
  • This view is the most dramatic, it makes us think that wave is coming right at us. This gives more drama than having the waves flopping harmlessly about in a giant washtub at our feet. There is excitement because that wave is COMING RIGHT AT US!
  • The low vantage point drops the horizon, so that the water and rocks can break and conceal that straight line. That's a big help from a design standpoint. That long unbroken horizon is a big problem in seascape. Notice above, how Waugh ran those rocks up to such a height that they tower over our heads, their jagged vertical forms countering the horizontal thrust of the oncoming sea.
Because of this desire to paint an impossible viewpoint, most seascape painters are studio painters. They paint lots of studies on location, some of which are marketable, but most of their finished art is assembled in the studio.

I painted the water today in Rockport, Massachusetts at Halibut Point. There was real good surf and I made a sketch that is very promising. After I work on it a little, if I don't ruin it, I will post it on the blog as an example of something or other.

Sunday, March 28, 2010

"Down in the hole" seascapes


I am planning to make little demo paintings to teach seascape. Here is one now. Because of that, I intend to break the project down into very small pieces. What I want to point out tonight, is what I call the "down in the hole" seascape. That's what you usually get when you set your easel up on the shore and paint on location. You end up looking down on the water. The sketch above shows what this looks like.

This creates a number of problems. One of the biggest is that you lose the overlapping of the forms of the waves and rocks. They come out stacked vertically. This also precludes having the waves or their spray break the horizon line. It also gives miles of open water above the wave, and that is not very interesting.
It is great to paint seascape on location, and some places you can get down in the wave action to paint, but because of the aforementioned problem I would rather research the sea on location and then compose the paintings in the studio. When I first started working at solving the seascape problem I did a whole lot of these. Some worked out, but a lot more didn't. Once in a while it would be OK, but you wouldn't want to hang a whole show full of these.

Saturday, March 27, 2010

Seascape book report.

Fredrick Waugh above from artrenewal.org
One of the comments I received last night was this;

I purchased two books recently; the first is Paint the Sea in Oils by E. John Robinson which I found to be very helpful. It is available on Amazon. The second is one I found on Alibris, published in 1975, called How to Paint Successful Seascapes by Roger Curtis. I wonder if you have any thoughts on these two books particularly the Curtis book since you and he have a similar Rockport experience.

I guess I will start with a list of some of the books on seascape and some opinions on those. The E. John Robinson book is available and I think it is useful. A lot of good information is in there and it is one of the better books . There is much good information on designing foam patterns and understanding the form of a wave. I don't believe that any book on the market is ideal and I suggest you read as many as you can and try to synthesize them.. ( I know that's a tall order, but there is no John Carlson for seascape painting).

The commenter also mentions Roger Curtis. Rogers son, David, was my roommate when I studied with Ives Gammell. I went for a visit to his home and met his father the year that book was published I believe in 1975. I haven't seen a copy of it in many years and can't say much about it. If you have it, and like it, let me know.

The classic text is : Borlase Smart's Seascape painting step by step. Smarts book is the best I guess, but it is a bit odd in my opinion. Smart's palette seems very strange to me and the whole thing is sort of pre Beatles English poofter. Still there is a lot of good information to be extracted from it. It reminds me a little of Rickenbacker guitars and Humble Hawks. Sometimes the British can be very, well,........foreign. Sometimes not. In this instance they are a little quaint. Still this is probably the best available text.

Walter Foster, those people who sell the thin "how to" books in the art supply stores published a book on Waugh paintings that is still in print. It is the only available source of Waugh reproductions commonly available. Waugh had a collector named Ulrich who made his large collection available to Walter Foster. If you want to study seascape, this thin book is a must.

There is really no Waugh book currently available. I read a bio of him years ago form the library. It seems unfindable now. Some of you who like to hunt books might find it. It has a hard cover and must be 20 or 30 years out of print. Perhaps your local library can find it within their system for you.

Jack Coggins wrote a book entitled "The Marine Painters Guide" It is a good all around text for the beginner marine painter.Tthat really means boats, and harbors and sailing craft more than surf painting. Jack does however, throw in one chapter on surf painting and it is OK, but not exhaustive.

There are also about 50 titles with free and easy in the name. There are stacks of really amateur texts for the most amateur market. Particularly from the great era of amateur watercolor from 1950 to 1985. I have no idea why there would be so many weak books for absolute tyro's, but there are. Avoid em!


Thursday, March 25, 2010

About seascape painting.


The above painting is by Fredrick Waugh. Waugh was Americas finest seascape painter (in my opinion). There is seascape before Waugh, and that looks one way, and seascape after Waugh and that looks another way. No one paints seascape seriously today without having looked long and hard at Waugh. When I refer to seascape I generally mean surf pictures. Pictures where the sea meets the shore.
There were other painters who painted the sea, Homer was more artistic but Waugh did so much of it and so little of everything else that I think he gets the medal. William Trost Richards is another, here's a Richards below.

Making seascapes is generally done in the studio. Studying seascapes outside provides the raw materials. One of the reasons for this is that painters often want to show the surf from a position down in the action, that often gives exciting lines and perspectives. It also would require the artist to be set up in a place where the incoming wave will smash over him and his equipment.
lot of seascape painting is abstract. A seascape is as close to abstract painting as traditional painting gets. The sea obeys certain rules, it has an anatomy, but that still leaves lots of room for arrangement.

Copying photographs of the sea doesn't work as well as you might think . The anatomy of the sea needs to be expressed, like the anatomy in a figure. In order to paint the sea effectively you need to be able to show you know how it works. My old friend Charles Vickery used to call that hydraulics. I will begin laying out some of that anatomy in tomorrows post.

A question on shadows


I was asked recently;

Stape;
I have a question on shadows and their color. I think mine are either too colorful, or too gray, or too.......something. They are very difficult for me, is there a guideline to follow?
I am very conscious of values so I think I got the light and dark stuff right, but those shadows are difficult.

CBH

Dear CBH;
let me load more bullets into the magazine, and here we go.

  • Your shadows should always be darker than your lights. However in this picture I have cheated them really high key on the road. They are influenced by the material on which they fall.
  • Outside they will tend to be cool. The warmer the lights the more this will be.
  • I throw accents into my shadows to make them lively, see those in the ruts of the road?
  • Notice how I use the weeds to interlace the lights and the shadows. Here is a link to a post about that.
  • Remember that step one is observation. You need to be able to correctly observe what is before you and represent it. However, that may not be the best presentation. Sometimes you will need to be able to make some changes to get it to look better. The trick is to know when and how. There is one of the reasons that art is hard.
  • In this painting I have cheated the lights towards a yellow, the color of the light, and painted the shadows the local color rather than as violet as they actually appeared.
  • I don't know of a colored versus grave rule for color. I have painted them many ways and you have to figure that out for each picture.
  • You will need to study both nature and the work of artists who came before you. There are answers in both places and neither can be ignored.
  • Study Seago, Metcalf, Carlson, Constable, Inness, and Corot, these artists really knew how to handle shadows well.

Wednesday, March 24, 2010

Dear Stape, from Samantha

Below is an actual e-mail I have received. I have changed the name to protect the identity of its sender. I never imagined I would get a real Ann Landers sort of question, (cause I'm wicked edgy, just look at the picture!) but I will take a shot at it!

Hi, Stapleton...
I know this may not be the type of question you'd like to address, but it's something that deeply concerns me at this point. Please consider responding on your blog. Here it is:

How can an artist cope with the loss of their inspiration? Especially...what do you do when you have lost contact with the one person who deeply moves and inspires you and your work? I have been encouraged to not let that person go...in whatever form that takes...Have you ever lost someone who motivates and pushes you in your art?

I guess I'm asking several things...I have recently been cut off from the only person I have ever loved deeply. I want to continue creating work, but I feel so saddened...I'm at such a loss that I hardly know how to move forward. I want to win his heart back...that may or may not happen, but I know that as times goes by, I still need to be living life and creating. I know it's what I'm meant to do. It's a struggle without him beside me. Art and God have healed my heart before...so I'm hopeful! I'm just wondering your thoughts on the matter....Thank you for your blog; I have enjoyed it to the max!

Samantha


Dear Samantha

I can tell you are hurting. I don't usually do personal advice but I will make an exception. I have been there.

I know also that you can find the world is full of other fine people and that one of them is looking for you. Perhaps you already know them. Train yourself to smile every time your eyes meet those of every man you see. Most of them will be dorks, but you will also smile at the right ones too.

As for the artistic side of the problem, that is easier. You own that. Get up and do it every day. Inspiration is an outgrowth of continual effort and not the other way around. Do your art and the inspiration will follow. Earl Nightingale said "you wouldn't stand in front of a wood stove and tell it, give me heat and then I will put in some wood! You need to load lots of wood in there first".
You can't wait for inspiration, you must go about your work as a discipline. Sometimes you will be inspired. But working will breed ideas that become inspiration. I am always excited when I go to bed at night knowing I can paint the next day. I don't like it when I have an appointment that prevents me from doing that. The more I work the more inspired I get.

.............................Stape

Tuesday, March 23, 2010

Photos from my recent seascape demo

A student from my workshop in Rolling Fork has graciously e-mailed me a series of pictures he took of the progress of that demo. I will post them tonight. I often see this done with commentary like " and now I put in the wave" I will spare you that. I think you can see the process. I will answer questions though, or evade them and answer them in the later series I intend to do. This is a live demo in front of a class. I think I worked about three hours. I had no photos or reference of any kind and this is an imagined scene and not a real place I have memorized. It was invented using knowledge of wave anatomy and something about how light reveals form. I have also painted hundreds of these invented seascapes.

This is not the seascape chapter I promised, but I thought it was such a good series of pictures I would post them. I have to do some prep work for that or I would start it now. The man behind the curtain is paddling furiously.


And there you have it , my dear.

Monday, March 22, 2010

The attributes of color

I thought I might continue briefly with an explanation of the attributes of a color. James Gurney has been writing about this, and there is a link to his excellent blog on in my sidebar. You will need to scan back a week or so to see it.

You who are practiced artists will already know this, so enjoy the pancreas pictured above and humor me, there are people following this blog who may not. A note, or a spot on a traditional painters canvas has three attributes, they are;

  • Value, that is the degree to which they are light or dark. Value is of transcendent importance. A practiced artist might choose to alter this, but it is essential to know exactly what value things appear.Value is a part of drawing. Generally I work with the knowledge of ten values. I may choose to not employ them all but I parse values to that degree. Beginning painters look at the darks and say "there's a dark", I say "which dark is that?" beginning students lack enough separate values in their quiver to describe the darks. The same is true of their lights. I think learning to see values is best taught in the studio, painting still life or drawing casts under the correcting eye of a teacher who has acquired the ability to see values accurately.
  • Hue. That is what the color is named, Is it red, yellow or blue, or some note including all three. In practice I think in the colors on my palette. That is burnt Sienna or this is cadmium yellow. Doctors refer to the assemblage of bones held together with ligaments as the inominate bone, the bone that has no name. I often think in inominate colors. Many of the colors in nature are inominate, that is, they aren't red or yellow but a gray with a little blue and warmed with some yellow or some such combination. If you don't know what color it ids it probably contains all three primaries. Color temperature is part of this division, some hues are warm and some are cool.
  • Chroma, this is I think, the hard one. People don't usually deal with this unless they paint or do some color matching activity. Chroma is the amount of purity or strength of the color. Sometimes, when describing chroma, people will ask "is this a bright color or a dull one?" I usually express this as highly colored, or grave (lacking in color). The students problem I described a day or so ago was a failure to understand the difference between this and value, as a note became more colored they mistook it for becoming lower in value. Chroma and value are different things.
I intend to come up with some kind of an exercise to teach this difference that I can use in workshops. Maybe a magic bullet of some kind.

Sunday, March 21, 2010

Confounded values

I have finished the workshop in Rolling Fork, Mississippi. That went well. I had a great group of students who I worked mercilessly. Pat Walker, the organizer of the workshop really does a great job, she runs a dozen or so a year and gets some good instructors from all over the country. She provides gourmet meals and has a big studio building for teaching in on rainy days and for portrait workshops. The area around Rolling Forks looks like a Dutch painting and I found the old farm buildings to be great subjects. I believe I will be invited back next year. I also like that it is spring down there at that time of the year. Its fun to get a week of spring before returning to New Hampshire.

I noticed that Some of the students had a problem that may be common, but I had never noticed it before. They were confusing color with value. I know that it is important to know the difference between color and value. We often see that explained in drawing texts. I don't remember not knowing this, but I must have learned it long ago or known it instinctively. You more advanced artist reading this know the difference and are trained to see it, but newer students may not.

What I mean by this is that they confound color with value, when they see color they drop their values to represent it. If there was a roof that was red with rust, even though it was in strong sunlight and high in value, they dropped the value to make a strong red. Their rooftops in sunlight were the same value as their shadows. It was a curious phenomenon. I would guess that under the eye of a teacher teaching them to "see" in a still life project this could easily be eliminated. Perhaps cast drawing would help.

Color and value are somewhat independent. I told the students to go for value first and to get that right, the color could be injected into that. Value is a part of drawing and needs to be right to express the form before them. What I told them was :

If I held up the Mona Lisa in only values, like a black and white photograph, they would recognize it immediately. If I could hold up a skein of colors that was the color of the Mona Lisa, they wouldn't be able to recognize it. The Mona Lisa is represented more with value than color. Some smart 19th century guy said:

COLOR IS A DECORATION YOU HANG ON YOUR DRAWING!

Saturday, March 20, 2010

Your Signature

Above is the signature from the Ewing Farm painting I posted last night. One of the commenters asked me if there was a story behind my signature. I don't really think there is, other than that I have done a whole lot of them. Here though, are some pointers on signatures.
  • Sign on a dried canvas, so you can wipe it out and do it until it is right
  • Use a rigger or small sable brush.
  • Sign legibly, I can't imagine why an artist would have an unreadable signature. If people like the picture you want them to know who you are.
  • Sign the thing neatly, many parts of a painting may not receive close scrutiny, but the signature will.
  • The signature should be level. It will be next to the rabbet of the frame. If it is crooked that will show and look sloppy.
  • I think a signature should be large enough and clear enough to be easily read, even in reduction.
  • I date my larger paintings. When they come up for auction and they are old, I am glad they are dated.
  • Always sign in the lower left hand corner unless there is a good design reason not to.
  • Don't try to develop too stylish a signature. Your signature will develop in paint, just the way your handwriting did.
  • I often sign in red. Many of the historic painters did this and I like the way it looks.

Ewing farm

Here is todays demo picture, an 18 by 24. It was actually a two morning effort, but I talked a lot as I did it. These old farm buildings are from the turn of the century. The subject matter here is so like that used by the the Dutch painters. The low horizon line and the old buildings really made for a natural design. I wonder who used these buildings? They are all in ruins now.

I appreciate the 30 comments I got on the seascape. I have never had so many before. Whats with that? I will do a series of seascape posts. I will have to wait a week or two to begin them because I am going to have to make a painting and photograph it step by step to do that.
I have taught all day and can't write more. I will be back tomorrow.

Thursday, March 18, 2010


Here is a seascape I did as a demo today.It is about three hours work. I also led the entire class through a seascape painting of their own I am exhausted. I am having a great time, but I am pushing really hard. I have a good group as usual. It seems that people who take workshops are a pretty good lot.

I hadn't planned to paint seascape with them, but we had a really gray day and it seemed like a good time to be in the studio. I have been painting seascapes for years but I have never taught it. I did the demo and they all wanted to try it. Some of them did surprisingly well. Seascape is the hardest thing I do.

I guess I could do a series of posts on seascape painting if there is interest out there in that. Let me know. I don't know that I am an expert in it, but I have done a bunch of them.

Wednesday, March 17, 2010

The five word description

John Enneking, courtesy of the artrenewal.org A great online museum of painting.

I mentioned the five word description in passing the other day. Several people remarked on it and I thought I might give the idea its own post. Every artists seems to have a description that the collectors use among themselves about him ( or her of course). I know the description that is commonly used about several painter friends of mine. One of my friends always gets this golden boy glowing review, he deserves it and it really helps his sales . Another artist I know has a reputation as being hard to deal with and that hurts him. What your description is, is important for your career. If you can control, set or effect what the description on you is that's a great thing.

A number of years ago I was looking at my favorite art magazine and saw an advertisement for a group of three artists I vaguely knew and they were being billed as "The New American Luminists". They painted like the Hudson River School. When I saw it I laughed, it seemed a stretch and I didn't think it was a very good marketing ploy. Boy was I wrong! In the decade that has followed this little cadre of painters has ridden that title to enormous success. People still think of them as that. And I guess they are.

There are young painters who get classed as HOT who have a rocket ride through a couple of shows. They then are reappraised. Some of them drop out of sight just as quickly as they appeared and others maintain that level. It is hard to be the new guy on the block for very long. It is a perishable position.

There are also artists who have managed to attach a title to themselves. They are the "painter of sealife and hopping whale thingies". Or they are the "foremost painter of the civil war", or they are the "guy who you collect if you live in Southern Arkansas. There are artists, who are the one who paints 19th century ports and shipping. Those are all labels that tell people this guy is who you want if you like those things. Often it is advertising that has defined that description for these artists and it has taken many years of work to get that recognition.

It is a good thing to try and find out what description the world that knows of you is using. If you like it, you want to promote it in your advertising. If you don't, you need to try to replace it with one you like better. I guess this is called branding. I believe I will write more about that soon.

Tuesday, March 16, 2010

A tip for placing buildings into a landscape


I taught today here in the Mississippi delta, I like it here, it reminds me of Dutch paintings. It has the big skies and the low horizons that guys like van Goyen (above courtesy of art renewal .org) painted so well.

We painted a group of low barns with a dirt road meandering through them. I did a demo in the morning that came off well enough.Then I turned the students loose to work on there own paintings as I ran from easel to easel to give individual instruction. Many of the students had a problem designing the architecture into the landscape, Their barns seemed to have an uncomfortable place in the landscape. Several divided the canvas by area into barn and landscape with neither taking prominence. What I recommended they do was this.........

Paint the landscape first and drop the barns into it. Put the barns into the world, rather than build the barns and wrap the world around them. That way they are painting the elements in descending order of scale. The land and trees and sky are big, the barn is smaller so it is placed into the already established tableau. I suggested that as they lay in their paintings they rub a place holder spot out to represent the structures, but then to get the landscape done.

This gives a couple of advantages. It gives a more believable look, but more importantly many landscapes with buildings in them get too linear, too many right angles and hard corners. The antidote to that is relieving those with the rounded and undulating shapes of the land and trees. Painting those in first makes them more dominant than painting them as decorations gathered around the buildings. Above is a similar scene to the one we painted today that neatly shows how it is done. Lots of air around the buildings and they are within the landscape.

Monday, March 15, 2010

And what are the 5 most significant actions you took to raise your profile in the art biz?


I just couldn't post that image of me as Ann Landers again. Here's a chicken skull instead.


I was also asked by the same reader;

And what are the 5 most significant actions you took to raise your profile in the art biz?

I will begin with the usual disclaimer that my profile in the art biz could use a fair bit of raising yet. I have had some success by these means (bullets please!)
  • The blog, has been a real good method of getting my name recognition up. It is a lot of work but it doesn't cost very much. I think it is real important to have other painters know who you are. In the long run that percolates out into the market, even though they are not your customer.I am not sure that this is useful for a lot of people but I do know other artists who do this well. I don't think you can do a good blog just about yourself and your own art. I think people want to be rewarded by learning something when they log on. You need to have something of value to say.
  • I think doing shows and being in members organizations is good too. I show at the Rockport Art Association, the Guild of Boston Artists and sometimes at Old Lyme. They are not really sales venues for me, but they get your work out in front of people. You should do some of those shows every year. Also jurying shows is a good thing to do that establishes the opinion that you are expert and theoretically know what you are talking about.
  • Being in magazines either as editorial content or in advertising is good too. I have a few of those every year and although it is not obvious what effect they have it does build name recognition. I seem to get into a bunch of smaller regional magazines, as they call me. I like them, and always am happy to provide them with jpegs and quotes.
  • The gallery in Rockport was a great thing for reputation, I no longer have my own gallery, but when I did, people would say "he has a gallery in Rockport" and that made me seem "real" It is about being "real", there are a zillion artists. It is good to separate yourself from the herd, something like having a gallery or being important in an art organization or whatever, that helps you to control the five word description that is out there on you. When I was young "he did a duck stamp" was the last word. There are lots of those descriptions today. Madonna collects her art. He has a painting in the white house. Or she did a mural in the airport. All of those are examples of a few word statement of the sort you want attached to your name. Some examples of what you don't want are: he's OK when he's sober. He used to be good when he was younger, or he paints them all the same. You have to try and control that five word description if you can.
  • Sometimes just hanging out for a long time and being known as someone who works hard and has stood the ground for years is the best thing you can get. You keep popping up, till people think "Oh yeah I've heard of him" You can be good, but new and young and you just have to hang around until they notice you. If you are good, eventually you will get recognized. But it can take a long time. There are a lot of people clamoring for their spot in the sun. It may seem a little unfair but just being around a long time is a good thing. There are artists who suddenly appear and then rapidly disappear. I won't name them here.

Sunday, March 14, 2010

Ask Nice old Mr. Stape


A reader asked me,
What are the 5 most significant actions you took that increased your income?


Now there is another great question. actually they asked me three of those name five questions. Last nights was the first and this is the second. I have just arrived in Rolling Fork, Mississippi. That's a long drive from New Hampshire. So this is going to be a short but hopefully useful post. Bullets please!

  • Opening and running my own gallery was a big thing. It gave me my own one man show, running full time that had to be there and had to be constantly updated. I had to learn so many things and develop so many skills. It was a forced grad school for me.
  • Because I had my own gallery showing only my own work, I got to interact with thousands of visitors, observing them taught me a lot about how people who knew less than I did about art, thought about painting. It is a good thing to know your market, not because you will paint for them, but you WILL market to them.
  • Not having a job, a backup or any savings helped. I was deadly serious, If I didn't sell, I starved. That puts your mind on your work, for sure. Having to paint to survive was the greatest teacher I could have had and has made all the difference. I don't recommend it for the faint hearted though.
  • For a period of years I advertised a lot. I advertised in the American Art Review, a great magazine, It cost a lot but it really did build my reputation. I don't have my own gallery so I do less of that now. I think I will start again though, I miss it. If you are not a pro, this is not useful.
  • Doing demos, workshops, being president of the Rockport Association, writing blogs. All of these outreach things build your reputation. Sometimes I think you are paid for your reputation not your art! You need to get out into the world and do things for people. I really believe if you want more from the world you have to give more. Go out and give things away. Do things like these to build your reputation.
Earl Nightingale suggests being a leader, and expert in your craft, to lead the field. I again suggest that you get his material. It is one of the major things that increased my income. Might work for you too. This blog is partially done at the suggestion of Earl.

Goodnight!

Saturday, March 13, 2010

Ask nice Mr. Stape!


Stapleton;

What would you say were the 5 biggest changes you made to your thinking that increased your sales?

signed; A friend from Maine


Thanks for the great questions. Well lets see............................
First off I don't do most of my own sales anymore, I work through dealers. But I still do some. when I had my own gallery I did a lot of sales. I don't claim to be terribly good at it, I have known some people who are and I can see the difference. But I have sold a lot of art. Here are (with bullets no less) five ideas that increased my sales.

  • It is a mistake to judge other peoples ability to afford things based on your own. OK, you can't afford a 15,000 dollar painting, but it would be a big mistake to assume that the person with whom you are dealing can't. When you set prices, don't take into consideration your own ability to pay for things. Price is relative and there are people who have the money and the willingness to buy fine, carefully crafted art and spend enough on it to provide a good living for its creator.
  • Don't give em a reason not to buy it. Don't tell people everything about a piece. You may eventually tell them something that will kill the sale. "Oh! we thought it was a catboat, we don't collect paintings of Rhodes 19's!"...........
  • Greet everyone who comes in your shop warmly, everyone. I used to say " Hi I'm Stapleton, I made all of these paintings. If you have any questions will you let me know?" For a while I shook everybodies hand and thanked them for coming in. It was great and I know it helped sales but I painted in the back of the studio and I couldn't keep stopping and starting my painting. But if you want to have people loving the experience, try that for a while. Probably works in Sweden too.
  • Interview people " Do you collect?' "have you got a place in your home for a painting of that size?" Why do you like that painting? rather than the other one you looked at first?" If it cost 7000.00 would that be a problem? What is your home like? is it formal? Do you have antiques? I also never do alternative events closes, like "Well Mr. Gerbilknickers would you like me to wrap that up for you? or would you like me to ship it to your home?" Those are cheesy. They also make people feel forced or cornered.
  • The most common feeling people have in an art gallery is frightened. Light up the corners and keep it neat and clean. Don't be intimidating and don't pressure people. If you are tall like a giraffe, sit down after greeting them. Don't flash the names of artists at them they have never learned and
SELL TODAY, EDUCATE TOMORROW. -David Sandler

I checked it out by the way, and you can get the "Lead the Field" on your Ipod for 9.99. Thats an unbelievable deal. I am going to load one up and I already own the tapes. Thanks, Todd for that!

Friday, March 12, 2010

Some ideas on sales 1

That looked pretty good last time, why not post it twice? I am signing up folks for Lupineworld workshop June to be held at the Sunset Hill Inn again. This one will coincide with the Lupine season there. Join me this June 19th thru the 21st in the White mountains for a workshop with no big boots needed. The painting of lupines above was actully done near Ellsworth Maine, but you get the idea. Flowers, lots and lots of them. The fields in front of the mountains are covered with them, great subject matter. SIGN UP HERE FOR LUPINEWORLD!

Since I was talking about the Lead the Field series last night, I will continue with that theme a little more by discussing some things I learned in the gallery trade. AS you may know I ran my own art gallery, selling my art in Rockport, Massachusetts for many years. I learned many things doing that and it was a great experience. I am neither a born, or a gifted salesman, but I do know a few things.I will lay out a few of the things I learned over the coming days. Lets see.........

Never prequalify a customer ( or prospect in the sales lingo). What that means is, NEVER EVER assume that someone can't afford to buy or is too dim to buy your art,. It is impossible to tell . You must treat each encounter with another air breather as serious. You can't afford to blow people off, even if they seem out of it. Often people have no way to relate to you and may say really unhip things including that their family includes an artist who is only nine.. Smile, suck it up, and ask them questions. Find out if they might buy your art. FIND OUT!

I have sold a multi thousand dollar oil painting to a woman dressed in a bathing suit driving a beat up jeep when I was painting along the side of the road. My favorite carpenter bought a very fine large painting. Here is tonight's story. An old friend reminded me that I should tell it again.

I was with a group of perhaps eight painters and we were spread out like birds on a wire along a country road outside of Johnson, Vermont. A car came along the line admiring the paintings and as I was on the end stopped and asked me,"do you paint pictures of houses?" All of the other painters stopped and looked at me, knowing I could sometimes be a curmudgeon and wondering what I would do. I looked at the guy and asked sweetly "How big?" Her said "Oh about the size of that one you are working on there". I asked him "If it cost 7 thousand dollars, would that be a problem? He said it would be and rolled up the wind ow and drove off. Everyone in the line of artists laughed long and hard at that. But the point of this is, if you can't or won't pay my prices, lets find out and move on. So I asked him. He could not. I am sure he was a nice guy, but he wasn't about to buy what I do. It was over, and I went on with my life.

Thursday, March 11, 2010

Lead the Field


Tonight I want to tell a personal story and give a recommendation for Earl Nightingales "Lead the Field". Above is an old clip from when Earl had a television program. I never saw that, and had no idea who he was until...........

I had a gallery in Rockport, a shoestring undercapitalized operation, and I wasn't making enough money to pay my bills., I was making some money, but not enough. I decided I would visit an older and very successful artist who I knew. This fellow had a reputation for advising younger artists and I sought out his help.

His enormous studio was filled with the paintings he was working on for a major gallery in New York . He was one of the best selling artists in that gallery. I arrived at the time on which we had agreed, and he talked to me about painting and some production methods, and ways to get more efficiency in your painting. But then he stopped and asked. Do you know about "Lead the Field"?

I said no, I did not, and he wrote out for me an address, for the Nightingale-Conant company where I could order a set of inexpensive tapes of Earl Nightingale. Ordinarily a series of instructional tapes by some geezer who was the radio voice of Sky King would not have got my attention. But because it had been recommended so highly by this big time artist, I bought it. When it arrived, I put it on , and it changed the whole game for me. I am not the end all, be all in the art biz, far from it, but I can make a living. Here's where I learned a whole lot of the attitude that made this possible. It is a down to earth, no mumbo-jumbo course in sales and self growth for the real world.

My father was a doctor and so were all his friends, no one taught me how the world in general, and the business world in particular, worked. They were all salary men. Others did the business for them, I have had to do my own. Art is a business. If you have a problem with that, maybe you should teach, or work in Hollywood or design things for a company that hands you a check every week. Before Earl, I didn't understand why some guys made a living and I didn't, now I learned the score. If you want to earn more as an artist, start here.

Earl laid it all out in an orderly and reasoned, optimistic and nurturing way. So many of the unexamined ideas and preconceptions I had, were discarded as Earl explained what the world was about. I don't know of any book that had the effect on me, of these tapes. I can thank Earl for helping me get my act together and make a living as an artist. It is really all the same you know. Art is a small business, whether you are running a shoe store, or a gallery, or a department store, the principles remain the same. They are also timeless. Every week brings a slew of new business "how to books", and none of them replace anything that can be found in Lead the Field. Today it is on disk rather than tapes. If you want some wise mentor to sit you down and tell you how to make it in the art biz, or any other biz, you need Lead the Field

Item two. I am announcing a workshop to be held at the Sunset Hill Inn again. This one will coincide with the Lupine season there. Artists go there to paint the spectacular flowering fields. Join me this June 19th thru the 21st in the White mountains for a workshop I will call;

LUPINEWORLD 2010

SIGN UP HERE FOR LUPINEWORLD!

Wednesday, March 10, 2010

Knives

Here I am pulling things out of my kit and writing about them. Its an exercise in writing I suppose. I am actually stalling before beginning a series of art history posts, that will kick in later this week I think.

I own two palette knives. The smaller one is always on my palette and is an indispensable piece of equipment. I use it all day.The large knife is useful for loading paint into big tubes and scraping palettes and paintings that have dried.

I seldom paint with a knife, although occasionally I will use one to get some effects. I like to cut back into painted passages with a knife loaded with a background or sky color. I think of them as being a trick like an effects pedal for an electric guitar. There are artists who do great things with them and even more who do schlock with them.

If you do a passage with a knife get it right, because you will have a hard time reworking it tomorrow. It isn't as easy as reworking something painted with a brush.

I use a knife a lot as I work for the following things. I clean the mixtures off my palette when I run out of room to mix new ones. That is usually about every 20 minutes or so. I use my knife to re pile my paint that I have squeezed out, that is I turn some of them over so that the polluted part faces down.

I also scraped the surface of a dry painting before working on it in the studio. That takes down the physical edges and sometimes I strip the top of some of the more assertive brushstrokes off that way. I do this rather violently oftentimes. The side of the knife moving fast will slice the surface cleanly till it is flat, if the painting is very dry. Alkyd mediums make sure, for me, that my paintings are. Both of my knives are leaf shaped and have offset handles.

I also use my knife to trim the hairs that get out of line when I am painting, I hold up a bristle brush and cut off the hairs that stick out at a 90 degree angle from the ferule, I catch the hair against the ferule with the knife from the inside and cut it away from the brush. Looks tough when I do it.

Several other items next.

Above is an alligator I photographed in South Carolina. I believe this one was about 60 feet long. He lived on Kiawah island. This monster subsists on a diet heavy in poodles and mixed terrier breeds.

Here I am painting in Charleston. It was warm most of the time but early in the day and late I needed to wear my warm hat and this unattractive coat that looks like it was made from a Hefty bag. That Moxie is from the only 12 pack of Moxie that has been in South Carolina in modern history.

A commenter corrected me in an error I made when mentioning Marc Delessio. I stated that he taught at the atelier of Charles Cecil in Florence, Italy, but he studied there and teaches now at the Florence Academy headed by Daniel Graves. If you are in Charleston go see his show at the Ann Long Gallery and mine and Scott Moore's next door at the Ella Walton Richardson Gallery.
If you have never seen Charleston, you should. It is a very historic, unique and beautiful city that has many art galleries.

Tuesday, March 9, 2010

Music on location.

Continuing with the packing for a road trip theme, here is my music machine. I keep this in my backpack. This little player holds an iPod that is loaded with many hours of music. It runs on AA batteries and every night I charge the iPod from my computer and update it from the web if I want to add music.

My wife burst into the studio with it one day excitedly explaining what a good deal she had gotten from Sam Walton on it because it was a hideous pink color, "you don't mind do you?". I taped off the speakers and dashboard panel assembly with duct tape and shot the device out in the backyard, with black auto enamel

Above I have opened and spread its little sternum to reveal "the ghost in the machine" If you don't have a little MP3 player, I suggest that it is a great invention. They are so common now they are no longer new technology and are simple to use and amazingly portable. They will work when spotted with oil paint also.
Some of the things on my Ipod are;

  • Jeff Beck, Live at Ronnie Scotts
  • Live Grateful Dead concerts.
  • Debussy
  • Albeniz, Iberia, played by Alicia De Larrocha
  • Pat Metheny, The Way Up
  • Townes Van Zandt
  • Savoy Brown
  • Muddy Waters
  • Steve Winwood, Nine Lives
  • Johhny A, Get Inside
  • Moe, Live concert
  • Mark Knopfler, Kill to get Crimson
  • Mansour, Cheshman Siah
  • Dick Powell, I only have eyes for you

Monday, March 8, 2010

Some Stapisms

Above is a Carl Peters painting. Carl was from Rochester, New York but summered in Rockport Ma.

I am home and very tired. I can't write much but perhaps I can give you a few phrases that I use with my friends.

There are three stages in the completion of a Stapleton Kearns painting.
  • I'm almost done!
  • Boy, I sure hope I'm doing this right.
  • This was going to be really good, not like you think either, I mean really good!
I often say; If I were going to be really good at this,
I would already be really good at this.

This is a STUPID way to make a living.

I had to lay down to paint that!

He paints like Ray Charles!

Whats the deal with Alex Katz anyway?

Its so hard painting outside it's a wonder anybody ever gets a painting.

I'm really not smart enough to be doing this!

I get way too hung up on what the paintings actually look like!

I thought I would put this, right in the middle of the painting.

When I die I am going to have all of my unsold paintings encased in Lucite and use them as a tombstone.

My epitaph is going to be;
STAPLETON KEARNS
HE WAS OK.

Girls LOVED me when I was young,
they imagined I was sensitive.

I am planning on getting a tattoo on my forehead that says IMAGINE HAIR.

Mistakes have been made. (Ronald Reagan)

I left high school early to more fully participate in the 1960's

I'd like to take this opportunity to thank you once again, for your participation in this evenings activities.

Saturday, March 6, 2010

Packing for a painting trip on an airplane


Above is another painting I made for the Charleston show, at the Ella Walton Richardson Gallery. This was painted from a beautiful spot on Kiawah island. I studioized it some though.

I was asked a few questions about packing for travel by airplane and I thought that I would write briefly about that. The last major airplane trip I did was to Venice. I took a Pochade (pronounced pochade) box. Mine is an Easy L with which I am happy, but there are other good boxes out there also.

Into my suitcase I packed;
  • The Easy L
  • A light tripod in a cloth bag with shoulder strap
  • A backpack, empty
  • I cut a roll of canvas into 20" lengths with my chopsaw. I could then cut 16 by 20s or 16 by 24's out of that. That went into the suitcase. Also about ten 8"by 10" primed Masonite panels.
  • two sets of 16 by 20 stretchers and 1 set of 16 by 24 stretchers, also a staplegun and staples and canvas pliers and screwdriver.
  • A couple of cigar boxes full of paint.I downloaded on Gamblins web site the specs on paint showing that it was not flammable or dangerous I included this in the box with the paints.
  • Brushes and medium cans.
  • No solvents.
  • Two softcover and one hardcover book on Edward Seago.
I also carried my small camera and seven days changes of clothes. I wore a light jacket. I did sink laundry with dish detergent and hung my clothes up to dry in the bathroom. One time I went to a laundromat.

When I landed in Venice I found a good art supply store where I bought alkyd medium and more Titanium White. I found a hardware store where I could buy mineral spirits.

I stretched three canvases, two 16 by 20's and one 126 by 24. I used lots of Liquin so I had fast drying times. When I had painted on the canvas I took it off the stretchers and put a new canvas on them. Then I rolled all of the canvasses around the tube on which I had brought them. On the last couple of days I painted on the panels. I separated them with little U shaped metal staple thingies I found at the hardware store, taped around them and wrapped the whole show in paper.Because I painted those panels the last days the canvasses I did were dry and could be rolled. With my Liquin I was getting 24 to 36 hour drying times.

I have a plastic tube made for skis that telescopes. I can use it to take a Gloucester easel on an airplane. There is room in there for a roll of linen also. It looks like a rocket launcher. Security thought it was a gun case. When I opened it for them they didn't know what it was.

I wil probably be unable to post tomorrow as I will be on the road.

I met a great young artist tonight. He is Marc Delessio he opened a show at the Ann Long gallery tonight. He is very 19th century classical in approach, and studied and now teaches at the Florence Academy, that is headed by Charles Cecil, who was a student of R. H. Ives Gammell, although he was there just before me.Here is a link to Ann Long gallery

Friday, March 5, 2010

Fixing a punctured canvas


Here's another picture from the Charleston show, that opens tomorrow night on Broad street at the Ella Walton Richardson gallery. Behind me is Fort Moultrie, site of a revolutionary war battle. And to my left is Fort Sumter, whose bombardment began the civil war, or the war between the states as they prefer to call it here.

I received an e-mail from a reader explaining that he had accidentally shoved a brush through a painting and wondered how he could fix the hole. There are several ways to do it. One is to reline the canvas. I will go into that another time. You can do it yourself, but it is difficult and takes more skill. I will cover the quick and dirty way to do it.

I am assuming that the hole is smaller than a penny, if it is bigger, this method begins to become more difficult. This method will also work on a three corner tear. First smooth out the canvas in the area and clean up any ravelings that are hanging about the hole. Then cut a piece of canvas, hopefully of a lighter weight than the one you are repairing. If you haven't got something lighter use a piece of the same canvas, you may have to take it from that which I hope you are in the habit of leaving turned over on the back. Cut an attractive patch from that, I cut a rectangular patch and then clip of the corners at a 45 degree angle so it looks a little slicker. If you have a pinking shears use those, that gives a nice look too. This is important to do neatly, if someone sees the repair, they will accept it only if it looks neat and professional.

Glue the patch behind the hole. I have used a number of kinds of glue. I have used fabric cement and an industrial glue in a tube. Carpenters glue should work too. Let that that dry completely before continuing with the next step.

Now fill the hole from the front. I like to use a mixture of flake lead and liquin but you can use titanium white or even spackling compound or wood filler, this IS the down and dirty method. When that is completely dry, sand it lightly with a fine paper. If you are sanding the lead filler, wet the sandpaper with mineral spirits so you don't breathe the dust. You may want to don a mask for this.

Don't do this around your kids, don 't do it you are pregnant, don't do it if you are a wellness dweeb or living all natural. In fact, oil painting involves lots of toxic chemicals and you need to be aware of that and exercise caution. Sanding paint can generate aeresol dust and that is never good, So be careful about that. I wet sand for that reason, and I wouldn't sand down a whole canvas, only the ocasional small area. When I do, I breathe through my ears.

Feather the edges well so that the filled hole is level with the painting around it. This must be done very carefully so it doesn't show. You may have to fill and sand twice, try using a palette knife to fill the hole, that works well. When that is done and dried out paint it with liquin ,let that dry and then varnish it, It needs to be completely sealed. Varnish it several times, it absolutely has to be sealed! Then retouch varnish the whole painting to bring your color up so it looks like wet paint, that will help you match the area.

Now inpaint the patched area, If you were a restorer you would carefully match the colors and only inpaint the patched area, but since this is your own painting you will probably find it easier to repaint the entire passage. If you are an impressionist with brushwork, painting opaquely this is not a big deal. If you are painting enameled surfaces in glazes, you are going to have a much harder job.

I have done this successfully many times. If you work with care and precision you should be able to get a nearly invisible repair that will last the life of the painting. Now listen up! What I am about to say next is important. This is to repair your own work or possibly the work of a friend only. Do not do this to an antique painting of value. A real restorer should be called in to work on anything that has age or value. Also you cannot inpaint on an antique painting the same way as you can on your new one, it will darken over time. To paraphrase Joshua Reynolds.........

DO NOT HELP TIME DESTROY EXCELLENCIES WHICH YOU YOURSELF WILL NEVER RIVAL.

Thursday, March 4, 2010

Wring out your dead!

Here is a piece I am putting in the show in Charleston. I have been down here painting for several weeks. The show will be at the Ella Walton Richardson gallery on Broad street. I painted this out on Kiowa island. That's about half an hour below Charleston on the coast. It is a beautiful gated community. Lots of alligators. It seems a little odd to me that such an expensive community would be filled with enormous monsters that bite. They would, I think, never be tolerated in New Hampshire.

Below is a tool I keep in my paintbox.

This is a tube wringer. An artist friend I know stopped by the studio and showed me one. I had seen them advertised and never bought one. Well OK, I cheaped out and bought a plastic one. It didn't work and I threw it away long ago. This time I bought the metal one. Its a great little tool. It does a fine job of rolling the tubes and squeezing out every last drop of paint. I go through lots of paint, I think this little gadget paid for itself in six weeks. It also does a nice job of crimping the tubes when I am tubing my paint. Remember how to do that? Tubing paint is here.
I actually keep this in my paintbox and wring the tubes at the end of the day. You don't want to wring em too hard though, if you do it will rip the tube a little at the bottom and they will ooze paint.