Sunday, October 31, 2010

Red figured ware

Red figured war was produced and replaced the earlier black figured ware in about 530 B.C. and was produced until about the 3rd century B.C.
It is essentially the opposite of the black figured ware.

The applied slip decoration is bone in the negative, leaving the red behind to serve as the image, in the black figured ware the black was applied as the drawing and the red was left as the background color. The advantage of this was that it allowed the painter to work the small details with his brush. In black figure ware they had to be left behind like the whites in a watercolor or scraped into the black with a point.


The painting and the aesthetics has developed steadily and during this period it is at its height. Athens was the leading producer of these potteries which were sold through out the Mediterranean world. They were enormously popular and produced in a wide range of qualities. The poor used undecorated crude pottery. The finest sorts were very expensive.


In the 18th and early 19th century these vases were affordable, they existed in huge quantities and they were a common bring-home souvenir for elegant tourists to the Greece and Italy. Many of the collections about the world got their start upon the collections of a private party.


The drawing and elegant design of the vases is of the highest caliber and they are works of art that equal the art upstairs in the more crowded picture galleries. When the galleries of paintings are too full, I go downstairs and enjoy the fine painting on the Greek vases.

To those of you who have weathered my posts on classical pottery, thank you for your stamina. My sites stats have dropped like a stone since I started posting on this. I suppose most painters would wonder why they should know about this stuff. I think that the aesthetic sense is trainable and that is done by being acquainted with the art of your culture.

I have a post to do tomorrow on color temperature and then a couple of responses to reader queries. Then who knows what. But be forewarned, I intend to do the orders of furniture and English 19th century transfer printed pottery before I am done. Gonna have to cover some architecture, and define chriselephantine for you too. See you all tomorrow when I return to the art of making paintings.

Saturday, October 30, 2010

Black figured ware

Between the 7th and the 5th century B.C. a new style of pottery arose in Greece, black figured ware. This is when the painting on the pottery begins to rise to a high level of representation. The red is the clay of the pottery itself. The black is applied and actually doesn't appear black until the vase is fired.

Most of this pottery was made in first Corinth and then Athens. The individual artist begin to work in readily identifiable styles. Some of their names are known but most are given a name based on a particularly well known example of their work.

Mythological scenes were especially popular. Many of the vases also depicted athletes. Some of them are erotic and would seem shocking if shown in a magazine or on television today, lots of phalluses and friendly maidens.

Major museum collections like the Met's are fascinating to see and have hundreds of vessels to appreciate. I hope the next time you are in the museum you will add the Greek pottery to your itinerary, it is often some of the best painting there.
More tomorrow, I am too tired to continue.

Friday, October 29, 2010

Greek pottery, the orientalizing style

Late in the eight century the orientalizing style arises. The influence from othe cultures begins to effect the culture of Greece as trade grows with other partds of the Mediterranean.


The orientalizing style has a number of new characteristics. Its decoration is less based on narrow bands of decoration like the previous geometric. There is also the use of polychromy (multiple colors). Figures gain in importance, though mostly animal figures, not human. There is also greater use of naturalistic representation. There are palmette designs and mythological animals, like this lion below.


The piece below has figures though, also horses pulling chariots.


This last piece is by a "named" artist, well, sort of , he is the Honolulu painter. Many of the potters later signed their work but those who didn't are named after a particularly well known piece they created. This piece is the namesake for this artist. It is of course located in the museum in Honolulu. Scholars have identified works artists in various museums and using stylistic similarities, assigned them a name. We will get more of that soon as we go into the black and then red figured ware. That starts tomorrow night. Things get real sophisticated next. The next two periods are why I am writing on this stuff in the first place.

This thing is called the antikythera mechanism. It was made between 150B.C. and 100B.C. and is the earliest known mechanical calculating device. It calculates astronomical positions. It has over thirty gears and was found on a sunken wreck in 1900 by sponge divers.

Thursday, October 28, 2010

Greek pottery 1

I showed you an ancient Greek panel painting last night. I mentioned that there is almost know existent classical Greek painting existent (well, there are frescoed wall decorations, but we will get to those). Unlike the dearth of surviving work by Greek easel painters, there is an almost unbelievable amount of ancient pottery out there. When you think about it, that makes sense. The piece above is from the protogeometric period 1050-950 B.C. I won't show more of this because I am seeking to show paintings and this earliest pottery of the Greeks didn't include much of that.


I am going to do a short series of posts on this and I am beginning tonight with the earliest period called the geometric. Made from about 1100 to 750 B.C. ( I have lumped the protogeometric and the geometric into one era for convenience ) this pottery was turned on a wheel.

It is called geometric because it's decoration was in geometric shapes rather than figures, which later came to dominate the form. Much of it was used for funerary purposes, sometimes as markers for graves or as knick-knacks to console the deceased.

Pottery is a sort of artificial stone. It doesn't rot and won't burn. It breaks, but the pieces then remain. So there is an enormous amount of this material in our museums and private collections.

As you can see in the example above the patterns are arranged in bands running around the circumference of the pot. On a wheel, drawing a line around a pot was as easy as just holding something pointed up against the product as it turns on the wheel.

The decoration of the pottery progressed from a few simple designs in bands around the piece towards ever increasing complexity. Eventually every inch of the pottery was covered with decoration. The piece below illustrates a favorite motif called a meander. The wave design like a sine wave about the neck of this vase is a meander. Notice also the swastika designs about the waist of the piece this was another common design of the era. When we see that we think of Hitlers Third Reich, the ancient Greeks did not. It is a common folk decorative motif in many places and cultures around the world.

Later in this period the potters began adding figures of animals and then humans into their decorations. The figures are quite stylized. Here is an example of that below.

Much of this pottery was made in Athens but it was a trade good and ended up throughout the Mediterranean world.

Here is an oddity for you, do you know what this thing is;

Wednesday, October 27, 2010

Ancient Greek painting

Back to the paintings of the ancient world! The ancient Greeks prized paintings. However only four examples survive, of these, all are fragments except this. You are looking at the only complete example of an ancient Greek painting. There is another panel from the group of four that is a large fragment also showing nymphs like these in a closer view. There is no way to know how good or even typical examples of the periods painting these are. They were preserved because they had been placed in a cave.
The four extant examples were found in the 1930's near a village in Greece called Pitsa, hence the paintings are called the Pitsa panels. These were painted about 530 B.C. That makes them about 800 years older than the Fayum portraits! We know the names of a number of the ancient Greek painters, some from as far back as 700 B.C., but their work is now lost.

The painting shows a ceremonial procession with nymphs leading a sacrificial lamb to an altar. All of the figures are seen from the same side view. They are outlined in black and then filled in with color. They are painted on wooden panels coated with plaster. The artist did have a rather wide range of colors though, white, black, brown, blue, green, yellow, red, and purple.

However one sort of painting has survived from the ancient Greeks in enormous quantities, vase painting. There are over one hundred thousand extant ancient Greek vases. Tomorrow I will begin showing some of those. I love Greek pottery, I think when you see the art on it, you will too.

Tuesday, October 26, 2010

Repairing a hole in a painting


Dear Stape


Help! I was completing a large landscape (30x40) from a small field study. I was adjusting its position on my easel when I lost control of the whole mess. I knocked the painting into the corner of a metal object and...you guessed it put a 3/4 inch tear in the linen. Here is my question....In cutting the painting down to try and save what amounted to a pretty good effort am I better off restrecthing it or mounting the new incarnation onto a stiff support like MDF or Illustration Board? Any suggetions you can make will be greatly appreciated.
Thanks, Stape,
.................................. Penny Traited

Dear Penny:

There are several solutions I can think of, here they are. You didn't tell me, but I am assuming you have what is called a three corner tear. Maybe not, but the solution is probably the same.

  • The quick and dirty fix is to put a patch on the back . Use a piece of canvas and glue it to the back of the canvas ( it might be good to use a canvas of a lighter weight than that which you are repairing). Glue the patch to the back of the hole with one of the fancy new glues found at home depot. Read the label and look for textiles on the list of what it will glue. Try to get the canvas on the front of the patch as smooth as you can and carefully trim off any ravelings that show. This must be done carefully but usually a three corner tear will lay down almost perfectly. Then infill the repair with acrylic gesso, Sand the area before you gesso it so the gesso isn't on shiny oil paint. If you can get it back to the ground that is best. Feather the edges of the area you have sanded to get a smooth transition to the rest of the painting, then varnish that a couple of times. Sand the repair well and then paint over it, let it dry and varnish, you will probably have to do that twice. You will probably have to repaint the whole passage, and build up enough paint to conceal your repair. This doesn't work on very smoothly painted or high gloss paintings. But for an impressionist landscape in thick paint it will work well. This is as I said the quick and dirty version and not the "best" way to do things but it works and will stay fixed.
  • The second fix is to mount it onto a panel. You can clean up the puncture and then cover your panel with carpenters glue, Miracle Muck or your favorite mounting glue. Then press the canvas onto it. Some books and things piles on top for weight overnight will assure a better bond. If you have a friend in the picture framing business, see if they will let you throw it into their vacuum mounting box. That does a good job.The hole is then filled and varnished and inpainted as before.
  • Here is the most craftsmanlike way of doing the repair, it calls for some specialized materials that I have and am familiar with, but you may not be. Stretch a receiver canvas about four inches larger than the canvas you intend to repair, after you have removed it from it's stretchers. Heats up enough picture restorers wax ( hard to find these days I suppose) in a double boiler to paint the back of your canvas. Then turn the canvas upside down and place the reciever canvas over it. Using a hot iron melt the two canvasses together. What you are doing is relining the original canvas, attaching another to it's back. When it has cooled, flip it over and infill with flake lead which can be scraped a little with a palette knife to make it smooth. Varnish that, and then inpaint the passage and varnish again. Let this sit for about a week because it is almost sure to sink in. Then when it has, varnish it again. This is the old timey way of doing things and the methods and materials are a little 19th century, but it makes an invisible and secure repair. This is probably more technically demanding than the average painter out there is going to be comfortable with. All of this is a lot easier on a roughly painted impressionist piece than a smooth academic painting. If you want to fix anything that has historic value, that is a job for a real restorer. Never work on anything that is old or has value, only your own art.

Monday, October 25, 2010

Post #675

This young lady looks like a girl you might see at the mall. But she died seventeen centuries ago. The portraits in this post are from Fayum near Cairo in Egypt. There were painters in the ancient days, but virtually all of their art is long decayed. However the dry climate, and the funerary customs of a hybrid of Egyptian and Greek culture created these funerary portraits. Many of them are as fresh as when they were painted in the time from the first through the third century A.D.

Egypt was a part of the Roman empire at the time and the fayum oasis area was home to a minority population of Egytpianized Greeks. St. Mark (author of the gospel of Mark) was sent out by Paul in the year 43 to evangelize to Alexandria. The church he planted became the Coptic faith and continues to this day with the church of Alexandria as its center. These portraits are generally of early christian Copts. Theirs was not the only figurative portrait painting of the time, these just happened to survive unscathed into our own time.

These paintings done in encaustic (hot wax) or tempera on wooden panel were an improved version of the Egyptians existing tradition of painting portraits of the deceased onto sarcophagi. Even today in some European and middle eastern cemeteries it is common to see photos of the deceased preserved under glass or printed onto steel plates. I wish old New England cemeteries had done that, when I walk in the old grave yards, I always wonder what the people whose headstones I am admiring looked like, and who they were in life.

The realism of these portraits despite the conventions that the artists used such as the large Walter Keane style eyes gives a clear and personal look into the eyes of these, often young people who lived, and died so long ago. It was not until the renaissance a thousand years later that portraiture would reach this level of characterization again. The painters of these panels understood form and light. Notice the structure expressed so efficiently in the nose of the face above. This is not primitive painting but a highly developed tradition of representation that went on for centuries. The portrait above looks like someone I might know, a student in college or a young professional guy. It has sensitivity and a style that would be"professional work" in our own time

These portraits were usually wrapped into the shrouds so that they presented the effect of looking into a window and seeing the face of the deceased who had been mummified.Examination of those mummies has lead to the conclusion that they were made upon the death of the subject as the age of the cadaver and the representation on the panel correspond. Life was short then and many of the portraits are of people we would today think of as having died tragically young. There are however mummy portraits of people of all chronological ages.

I think over the next few posts I will show some ancient painting. We all know the cave paintings at Lascaux but the painting of the Greek and Roman era is mostly destroyed, but there are a few surviving clues as to what some of it may have been like.

Sunday, October 24, 2010

Pen Drawing book for free

I would like to call your attention to a great little old book on pen drawing, mostly architectural subjects, that is a quick read and has some good ideas for the landscape painter. It is Pen Drawing by Charles Miginnis It can be read in HTML or downloaded for free at the Archive.org site. There are lots of fabulous books in there. Here follows an excerpt from the book that discusses the changes he has made to a drawing from a photograph. The thought process sounds like some of the things that I have written about on design.
--------------------------------------------------------------------------------------------------------
From the book Pen Drawing;

I have thought it advisable in this chapter to select, and to work out in some detail, a few actual problems in illustration, so as to familiarize the student with the practical application of some of the principles previously laid down.
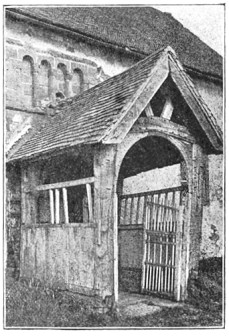
Fig. 35
FIG. 35FROM A PHOTOGRAPH
Fig. 36
FIG. 36D. A. GREGG

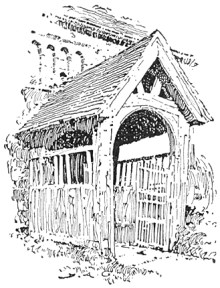
First Problem In the first example the photograph, Fig. 35, shows the porch of an old English country church. Let us see how this subject has been interpreted in pen and ink by Mr. D. A. Gregg, Fig. 36. In respect to the lines, the original composition presents nothing essentially unpleasant. Where the strong accent of a picture occurs in the centre, however, it is generally desirable to avoid much emphasis at the edges. For this reason the pen drawing has been "vignetted,"—that is to say, permitted to fade away irregularly at the edges. Regarding the values, it will be seen that there is no absolute white in the photograph. A literal rendering of such low color would, as we saw in the preceding chapter, be out of the question; and so the essential values which directly contribute to the expression of the subject and which are independent of local color or accidental effect have to be sought out. We observe, then, that the principal note of the photograph is made by the dark part of the roof under the porch relieved against the light wall beyond. This is the direct result of light and shade, and is therefore logically adopted as the principal note of Mr. Gregg's sketch also. The wall at this point is made perfectly white to heighten the contrast. To still further increase the light area, the upper part of the porch has been left almost white, the markings suggesting the construction of the weather-beaten timber serving to give it a faint gray tone sufficient to relieve it from the white wall. The low color of the grass, were it rendered literally, would make the drawing too heavy and uninteresting, and this is therefore only suggested in the sketch. The roof of the main building, being equally objectionable on account of its mass of low tone, is similarly treated. Mr. Gregg's excellent handling of the old woodwork of the porch is well worthy of study.

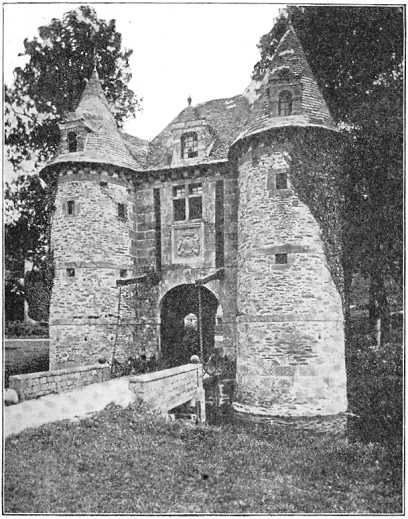
Second Problem Let us take another example. The photograph in Fig. 37 shows a moat-house in Normandy; and, except that the low tones of the foliage are exaggerated by the camera, the conditions are practically those which we would have to consider were we making a sketch on the spot. First of all, then, does the subject, from the point of view at which the photograph is taken, compose well?* It cannot be said that it does. The vertical lines made by the two towers are unpleasantly emphasized by the trees behind them. The tree on the left were much better reduced in height and placed somewhat to the right, so that the top should fill out the awkward angles of the roof formed by the junction of the tower and the main building. The trees on the right might be lowered also, but otherwise permitted to retain their present relation. The growth of ivy on the tower takes an ugly outline, and might be made more interestingly irregular in form.
[Footnote *: The student is advised to consult "Composition," by Arthur W. Dow. [New York, 1898]]

Fig. 37
FIG. 37FROM A PHOTOGRAPH

The next consideration is the disposition of the values. In the photograph the whites are confined to the roadway of the bridge and the bottom of the tower. This is evidently due, however, to local color rather than to the direction of the light, which strikes the nearer tower from the right, the rest of the walls being in shadow. While the black areas of the picture are large enough to carry a mass of gray without sacrificing the sunny look, such a scheme would be likely to produce a labored effect. Two alternative schemes readily suggest themselves: First, to make the archway the principal dark, the walls light, with a light half-tone for the roof, and a darker effect for the trees on the right. Or, second, to make these trees themselves the principal dark, as suggested by the photograph, allowing them to count against the gray of the roof and the ivy of the tower. This latter scheme is that which has been adopted in the sketch, Fig. 38.
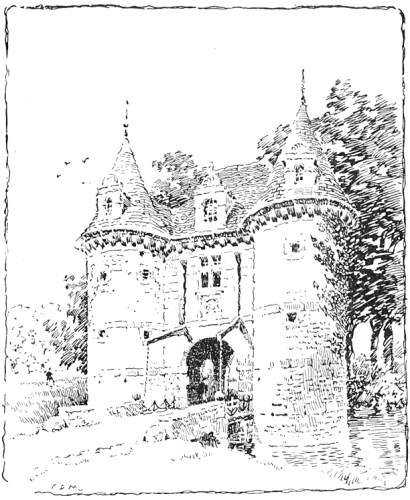
Fig. 38
FIG. 38C. D. M.

It will be noticed that the trees are not nearly so dark as in the photograph. If they were, they would be overpowering in so large an area of white. It was thought better, also, to change the direction of the light, so that the dark ivy, instead of acting contradictorily to the effect, might lend character to the shaded side. The lower portion of the nearer tower was toned in, partly to qualify the vertical line of the tower, which would have been unpleasant if the shading were uniform, and partly to carry the gray around to the entrance. It was thought advisable, also, to cut from the foreground, raising the upper limit of the picture correspondingly. (It is far from my intention, however, to convey the impression that any liberties may be taken with a subject in order to persuade it into a particular scheme of composition; and in this very instance an artistic photographer could probably have discovered a position for his camera which would have obviated the necessity for any change whatever;—a nearer view of the building, for one thing, would have considerably lowered the trees.)

Saturday, October 23, 2010

Multiple design possibilities from the same scene

Here's our tired old 9 by 12 again. Below I am going to show some variations on the scene.
Remember when you got your first apartment? With the Murphy bed and the mildewed harvest gold Pullman kitchen? You went to the grocery and got some stuff to eat, and maybe a highly rated, yet surprisingly affordable malt liquor you had recently seen advertised in a gentleman's magazine? After putting the groceries away you grabbed that box of Rice-a-Roni and looked at the picture on the front with swollen, hungry eyes. There was that delicious rice (and vermicelli!) and there beside it, sat a sprig of parsley and a peculiarly moist tomato wedge. You washed out a cheap aluminum saucepan from the sinkful of dirty dishes and started to read the directions, the malt liquor makes em fuzzy.

While smoking a handrolled Bugler from the can on the yellow plastic rattan nightstand, you add the two cups of water, actually the same Dixie cup twice, then emptying in the stupid little seasoning packet you discover that there is no little sprig of parsley and no tomato wedge either.
Knocking over the malt liquor onto the cat as you grab the Rice-a-Roni box to see the cover again, you see the minuscule print at the bottom of the deceptive picture, which says "serving suggestion". You put the cigarette out in the Rice-a-Roni and throw the whole show, saucepan and all into a leaking paper garbage bag under the sink.

Well, nature is like that, the scene before you is a "serving suggestion". It is up to you to make the thing interesting. You could make a dozen different treatments of the same scene. What if you decided it was about the water, it might look like this..................................

Or you might want your painting to be about the trees that are in the middle of the tableau, and maybe cast the whole thing into a color scheme based on a sullen tabby cat moistened with about a half a 16 once can of malt liquor.
That might look like this...............................

The point is, you can set your easel up and look straight down the middle and paint the usual descriptive picture, the one everybody makes, or you can bring some kind of personal treatment to it. Ask yourself not "what does it look like" but "what can I do to it?

Thursday, October 21, 2010

Poster shapes

John Carlson in his Guide to Landscape painting talks about starting a painting with the big "poster shapes". In Carlsons day silkscreened and showcard posters were very common. They were in stores and posted as advertising every where. Here are a couple of posters from that era so you can see how they looked.


These posters were silk screened, a way of mass printing that was popular for graphics in those days. Silkscreen printing lends itself into large shapes of flat color. That is the look that Carlson was referring to when he spoke of the big poster shapes.

Below is first that poor painting again and below it, my posterized version.


When I designed this little painting I reduced the big shapes to a handful and bound them together in value groups. I minimized the different values with in their big shapes to unify them into larger areas of a nearly singular value. Essentially three big darks and a big light shape.
I have posted on etching before and will probably pick up on that thread again. The etchers, particularly those in the 19th century did this particularly well and I have studied them a lot to get ideas. The Japanese printmakers used this kind of arranging too. Here is one of those, by Hiroshige.

Arrangement of simple flat decorative shapes is a good way to organize and plot the design of a painting.

Simplicity

Richard Parkes Bonington 1802-1828 from artrenewal.org

The root skill in landscape painting, (and probably all other sorts as well ) is drawing. Almost invariably my experience with workshop students leads me ton believe virtually all of them haven't suffiicient drawing chops to deal with the complexity of nature. That is doubly true as the light moves and that which they were observing the minute before is now illuminated from a new angle. I do get some students, often atelier trained before the cast who are happily able to render that before them with comparative ease. If you would set a goal for yourself to reach first on your journey into landscape, it should be the ability to coldly render the facts of nature before you. In a perfect world (or one that appeared perfect ) that would be enough, you would show up, report, and cash the check. But painting being an interpretive art and all, more is required in the practice of making pictures from nature.

That other thing is design.

DESIGN IS THAT PART OF A PAINTING THAT IS NEITHER COLOR OR DRAWING.

Wouldn't that make a fine neck tattoo?


As the root skill of representation is drawing, the root skill of design is simplification. Observed nature is often full of chaos and "noise". Designing a painting is imposing an order on it. The first step to that is to eliminate the nonessential, the complexly random and insistent filigree of endless crap that occludes most painting locations. This is particularly true in my New England landscape. Out in the wide open spaces there is more space, opened widely. A boatyard scene that I showed you last night is a fine example of a good subject but it was occluded with way too much baroque doo-daddery skittering about the image like spider monkeys on meth.

The first tool to getting rid of that is simplifying. The nonessential is jettisoned and the essential is presented simply. A clear statement is the result of refining the dross from a landscape. A landscape simplified into a handful of shapes can then be arranged into an intelligent abstract which is itself beautiful apart from what it represents.

Tuesday, October 19, 2010

More about values by decision.

Below is a detail of the upper painting.

Probably this is larger than the actual painting. Below is a cropped version of the photo of the scene. The blown up photo shows far more detail than I could actually see with my aging eyesight. But that is not a problem. My goal was to simplify, summarize and group things into areas of values. As you can see I have made the entire building with the chimney a dark value and down played the value variations within it. Then I put the pier in front of it in a light value. I have written about "value stacking" before and this is an example of that. I am stacking a light valued thing on top of a dark one.

I nave also dropped the value of the sand. I wanted my white accents to tell and if I had a big area of white sand they would not. The water tower in the background lights up because I have kept the value of everything around it lower. If you want a high key note to show, you need to stack it onto a dark one.I am always looking for ways to get my darks against lights and my lights against the darks.

I also wanted to caution you about this sort of thing. I am showing some grad level technique here. I assume that you have the skills to portray the scene as it actually is. That is the basic skill and must be learned first. Until you have that ability it is best to play it straight and work on your chops until you do, rather than altering the scene as I have described.

Monday, October 18, 2010

Enslaving values to design

I am still decompressing from the absolutely epic trip with fourteen of the nations finest painters to Provincetown, Massachusetts. We worked like dogs and partied some too. What a great trip! I learned all kinds of new things!

Above is a recent 9" by 12" painting I made, below is a photo of the location. I am not sure the photo is exactly from my position but it is from within a couple of feet anyway. Notice the enormous difference between the two.

I have simplified the scene a lot, and I have left out a lot of stuff, but I have done something more. I have set up a big pattern of light and shade, my values, and I have imposed them on the scene. I have "enslaved" my values to my design. My design is more important in the hierarchy of my painting than transcribing the actual values before me.

I wanted to simplify thew entire foreground into a big shadow shape. The benefit for me in this was that it set up my middle ground to be in a contrasting bright light. If I hadn't dropped the value of the foreground, the middleground light wouldn't have registered on the viewer. Even though I could see all of that stuff in the foreground, I deliberately "lost" it all into the big shadow shape I created.

I was asked by someone on the trip, after I had been out working on the same painting for about four hours, what I did to handle the changing light. My answer was:

I AM A PICTUREMAKER.


Because I have a formal arrangement of light and shadow that I am carrying out, the light can change some, but I won't need to follow it. I already have a pattern into which I am putting my light and shadow,. As the light changes, for the most part I will stay with it. Sometimes something really cool shows up and I alter my plan to include it, but I try to keep to my pre-designed value plan.

I worked this plan out in the first hour or so I was working on the painting, in a monotone underpainting that was pretty carefully worked up. It was almost a finished version of the painting in a single tone.

More about this tomorrow.

--------------------------------------------------------------------------------------


Snowcamp, a three day snow painting workshop, is scheduled for January 29th, 30th, 31st. Like last year, Snowcamp will again be held at the Sunset Hill House near Franconia Notch in the White Mountains of New Hampshire. Last year we braved some cold temperatures and had a lot of laughs doing it. After a day of painting in the snow, we all meet for dinner in our private dining room and enjoy the camaraderie of the other artists. This is a total immersion experience, a refrigerated boot camp.
We can walk out the inn's backdoor, and paint the panoramic views of the Whites and if our feet get cold run back inside by the fire for hot coffee. There are great locations all over this area if we want to leave the enormous grounds of the inn. Built at the turn of the last century, the inn is charming and comfortable without being too formal. I have taught three workshops there and it is an ideal venue. They also give us a special rate. This is sacred ground for American landscape painting, Bierdstadt, McEnteee and Kensett and nearly all of the other Hudson River School artists painted here in the1860's Here is the link to sign up.

I have filled one ten person workshop, and scheduled a second. The second is filling gradually. I am not sure just what it means but with one exception or so, everyone signing up is a returnee. I have 50% of last years participants back on the roster for this year. I think that is probably a recommendation for the event, if you are thinking of signing up.