Showing posts with label Seascape. Show all posts

Thursday, June 23, 2011

Hard on the top, soft on the bottom 2


Here is a 9 by 12 sketch demonstrating the hard on the top, soft on the bottom idea. It was done transparently with ultramarine and a little black. I forced myself to used the gradation formed by pulling the tones down from the edges all over. I then free associated the forms of waves out of the resulting goo.

Everywhere I have drawn the top of a wave I have gradated below it automatically. I also placed as many lines as I could against a light part of the gradation of the wave behind. The drawing grew organically like a doodle.

Making up water, not copying it from a photo is great training in building form and handling gradation.

Monday, June 13, 2011

Cranford Surf


Here is what I was working on for the quick draw event as Garin painted my portrait. I painted this under the overhanging eves at the entrance to the commuter rail station in downtown Cranford. We were allowed 2 and 1/2 hours for the project.

I don't quickdraw, I slowdraw. I have worked at that. I am rather meticulous, except on a seascape, I can get a rough seascape on a canvas in a couple of hours and so when I do demonstrations I like to do a seascape. I use no references and it is made up on the spot. The painting is not a place I remember. It is not a place that really exists.

I don't go to paintouts, I think this was my first. Maybe I have been to one or two before but it was long ago. But it was fun and I would do it again. I enjoy meeting the other artists.

I have so many deadlines to make around here. All the dealers want their art and I am way behind, I apologize for posting so late in the day but I am harried with travel and commitments.

Tuesday, July 13, 2010

Studying video clips for seascape


Here is an easy way to study wave action in your studio. If you are trying to paint seascape, I suggest you try capturing some little clips of wave action with your digital camera. I have wanted to do this for years, but in the olden days that meant taking a video camera down into the surf and the resulting product was clunky and hard to replay a short portion in an endless loop. Tape was clumsy, but the little clips my digital camera shoots, when viewed on my computer are easy to make, and easy to cycle through their action. I can get a real look at something that used to go by so quickly I felt that I had never really seen it.

Still photos are OK, but this is much better. If you keep clicking behind the moving counter on the clips you can run the wave again and again

I have been running little videos like these over and over. My simple Windows picture viewer will allow me to run part of a clip repeatedly so I can analyze the wave carefully. I shot this with a cheap little Sony Cybershot camera that my wife got a deal on because it was an unfortunate biological pink.

I like how low tech this all is, the camera cost less than a weekend of binge drinking and my simple Toshiba laptop cost me less than an OUI. The viewer I am using came free with the operating system and I didn't have to read a manual to figure it out. I don't read manuals.

The wave breaks into the picture and its back is rising up as the force carries it forward, under all of that foam, unseen, the back of the wave passes the front wall and the whole thing collapses like a lead trapdoor. That crushes all of the foam beneath it and smashes the front of the breaker forward against the rocks. This video shows well the tremendous weight of all that water.In painting seascape getting that power and weight is essential.

Below is another one, but this time I got wet. Frederick Waugh would have been very jealous of this setup. The wave below looks like a Waugh painting in motion.

Friday, May 28, 2010

Seascape 4

Here is the painting as it looks after today's work. Those are a couple of blades of grass encroaching on the left, I shot the picture flat on the lawn in the fading light. I seem to get better color that way. I spent a second day working on the lower left hand corner of the painting. Oh, and I straightened the horizon. You painting-a-day folks most be shocked. I think I am five days into this project now.

There is some chance I will finish this tomorrow, but more likely it will take me two more days to complete this 26x36. This is not a spectacularly long time for me to work on a painting this size. I have taken much longer. Tomorrow I will go after all of that rock and maybe buff up the sky. That should go pretty quick. Compared to the water it is relatively easy.

Thursday, May 27, 2010

Seascape project 3

Here again is the painted sketch done on location on the left and my layin on the right. Below is the second days work on the seascape, sorry the color is not better, I shot it in the failing light after working on it yesterday.


I do feel a little self conscious posting my stumbling towards my result, working outside I often go very directly to a finish. But seascape painting for me is much more experimental and much more difficult. But I am showing you how this picture gets made so you get to see me fumbling too. Boy, this picture better come out good, a lot of people are watching, and I know they will laugh at me if it doesn't!

I spoke a little last night about this pictures problems and today I went after a few of them. Painting is problem solving. It is a self critical process, I look at the painting and say,"why isn't this working" and then try to fix it. Sometimes I feel like one of those mathematicians in the movies from the 1930's who work on about six blackboards on their way to solving an equation. Below is the painting at the end of today's session.

I scraped the left hand corner of the canvas all the way down and went at it again. I still don't feel its right, but its better. I raised the end of the wave up so that I would be looking out at it, rather than down on it. I am trying to get it out of the "hole". I am not totally happy with the bottom line of the foam or the planes below it, but I am getting closer. I need to tie the structure of the rising planes beneath the breaker into the sea in front of it better, and the foam needs to roll down its surface more energetically. I hope I know how to do that tomorrow. I didn't today. Each days painting is a rehearsal for tomorrow's. Tomorrow I will refine it further. I am also getting closer to the tonality and value structure I want. I didn't work on anything today other than the water. I still have used no references, this is all out of my head. I am not painting a breaker that I remember, I am making it up out of wave anatomy and knowledge of how to build structures using light and shadows on planar structure.

I will show you tomorrow what happens next.

Wednesday, May 26, 2010

Seascape project 2

Here is the sketch for the seascape and the layin for the large version on the right.

Here is what happened to the seascape today. I shot this against the wheel of my car and it is a little dark and too cool, tomorrow night I will shoot it in better light, but that is what I had. The color from last nights shot is still a better representation.

Now you get to see me struggle with this thing.........

I have worked the whole painting. I began working out a more dramatic sky. Darkening that should make the wave stand out better because it won't compete with it for contrast. Also its more threatening mien gives the picture more power. I am hoping to pull the sea and sky together into one large unit. I need to work out a better arrangement of the small dark clouds at the top, I want them rushing to the right, that should help drive the wave towards the shore better.

I am not at all happy with the left hand side of the wave. It still feels like it is "down in the hole" a little bit. I want to lift it up more to the viewers eye level. Tomorrow that will get scraped out and reworked. It has to come up a little bit and the whole thing feels a little small. This is what I call the "in between stage", when the gremlins start to pop out. When I first lay a painting in, it seems easy and it is not until I start to get the thing worked up a little bit that all of the problems that will have to be dealt with appear. The first thing I will do in the morning is scrape the left hand side of the wave with my palette knife, leaving a sort of ghost image. Then I can take another run at it. Sometimes I do that over and over.

I have photography of the rocks, remember I am making up the water, there are no references for that. But I haven't looked at the rock photos yet. I want to design those and not copy a photograph of them I actually have pretty good information in the sketch. Once I get the design completely worked out I will use them to get some details in the rocks, but only a little. Good references can enslave you. I want to use them as little as possible.

Tuesday, May 25, 2010

A seascape project

I made this sketch on location near York, Maine last week. I actually made up the water, the foreground was filled with rock and weeds as it was low tide. It might look like this at high tide, I don't know. It has the defect that I wrote about recently that I call "down in the hole.". That's a problem that you get painting the sea on location. The water is too far below your eye level.I am enlarging the painting to 26 by 36 and reinterpreting it to look as it might from a lower angle. Below is my lay-in for a larger version having a lower viewpoint. I also made a few small changes here and there. This is the 26 by 36, so it is a lot larger than the sketch. I have only established the big poster shapes. This is about three hours of work.

Here are the two, side by side.

I hope to work on it again tomorrow and I will post the results for you to see, along with some commentary on what I am up to. This may qualify as the seascape demo I promised a month or two ago.

Sunday, April 11, 2010

Making rocks look wet in a seascape

Above is a photo that shows an effect which can be capitalized on when painting seascapes. Notice how some of the planes both large and scattered along the edges of the rock are reflecting the high key note of the light. That's what makes a rock look wet, that reflectivity. The mass of the rock is quite dark and often gets a blue value across the top, as I pointed out the other day. Now its easy to observe this in the photo. But if you paint this effect in nature and photos and learn how it works you can make it up. You can also install it into a made up painting or add it to rocks in an observed one.

Above is a section of a Waugh using this effect. The planes in the rock facing us are in Stygian darkness, the planes facing towards the light are the rocks color, plus the color of the light. You need to always know both where the light is coming from and what color it is.

The turning edges between the light and the shadow are in highlight.

Its pretty simple. This little effect can be all over a seascape. The little spots of highlight also make crisp accents that enliven passages. All of that sparkle makes a passage lively rather than ordinary and matter of fact. Many effects in painting involve knowing where the light is coming from, what color it is and how the planes in the object are receiving that light.

Above is a painting by William Ritschel an important California impressionist. 1864-1949 Ritschel was an early member of the Carmel art colony, moving there in 1911 after the San Fransisco earthquake and fire. He painted many surf subjects. Ritschel had a home on the water and spent a great deal of time observing the sea and its moods.

This Ritschel is from the Springville Museum of art in Springville, Utah. That's a pretty unusual view of the sea but there are many paintings from the historic Carmel art colony that painted angles like these. Many were done at Point Lobos.

Saturday, April 10, 2010

lahefhaflejfadfg;ldgv;ldvg;de;vf

I am in Bozeman, Montana tonight, a whirlwind trip. My daughter and I are going to ski the last weekend Big Sky is open for the year. It is late and I have spent the whole day on airplanes. So I will be brief. But I AM here!

Above is a little piece of rock from below the light house at Owls Head Maine, near Rockland. I show it because it has great color and presents some real opportunity as a reference shot. But it also has a problem. No water! This is typical of the reference shots I have in my morgue ( an illustrators word for a photo and clippings collection, probably archaic).

I could use this to make a seascape by filling the foreground with surf. I would probably throw a rock or two in the foreground too. So I am going to have an assembled painting with several elements all mixed together. Those elements would be, the cliff above, the water, probably entirely invented, although I might have a breaking wave photo that would be of some but not much use, and that foreground rock. This is pretty typical, I would probably also do a sketch on location if I could.

This would be a great seascape setup, but it hardly gets any surf at all, being in the Penobscot bay and not exposed to the open ocean. But it is great material. That is one of the reasons why it is necessary to be able to mix and match to build your seascapes in the lab. I am routinely adding surf to pictures out of my head, either because there is no surf on that particular day or because the location doesn't really get much surf. If the rocks are good, they present an opportunity and I can fake the rest.
Gotta have sleep, more tomorrow.

Friday, April 9, 2010

In which Stapleton argues for larger observation of rocks.

Here's a shot of Bass Rocks, in Gloucester, I have an enormous file of pictures of rocks. The photos aren't that much use when I am painting water, but they are more useful when I am painting rocks. Still I do a lot of inventing. The above shot is about as perfect a little set up as you could ask for in a seascape. But it is still, "down in the hole". That is, a wave inserted into this basin would be sloshing harmlessly down around your feet, rather than coming at you at eye level, which is much more cool.

So if I am looking at this as a reference I will have to completely adjust the eye level. That gets really abstract and I can't hope to get an accurate reposition like rich Hollywood stars get with a 3D computer modeling program. But I don't need it, because I am going to design attractive shapes using only the broad ideas from the rocks. Herein follows a big idea, I hope I make it clear. I am referring to something like what Ives Gammell used to call the BIG LOOK.

I am going to notice the trends, or patterns, like the rocks get blue puddles on top and have some warm yellow facets that turn toward the viewer. I will use that red glow that "envelopes" the rocks, its like cherries down in the deep shadows. I will play that up for sure! There is also ultramarine down in those shadows which do all sort of run together. Look at how forcefully that big rock on the left juts out into the water. The furthest little rock in the distance has a wave shaped like a triangle hiding its base. And the upper part of that rock is green.

Those are large observations, rather than copying by studying out that this little piece of rock here goes next to the little detail there, and then next to that......... Do you see the difference? The design of the rocks will be mostly my own shapes, hopefully artistic, with some inflow of interesting facts from my references. Incidentally I generally have a a painting that I made on location as a jumping off point. My location sketches are too random and matter of fact to be called a real seascape in the grand sense of the word. That is an "engine", which is what the critics and academicians in the 19th century called the grand studio assembled creations of the salon era. I think a seascape should be an engine in that sense too, a crafted yet natural appearing arrangement that has a designed beauty greater than the randomness of a snapshot or an accurate study done in plein air.

I do sometimes get a sketch I make outside that can be morphed a little and work as a seascape, but generally I see them as tools for the production of largely synthetic pictures. All of the Vickerys and Waughs I have shown you were machined out in the shop by their makers.

Wednesday, April 7, 2010

Rocks and black paper dolls

Above is another Waugh of course. I keep posting his paintings because they are such good examples of seascape. They get me all excited about painting seascape. I hope they do the same for you. Some of you who are out in the Midwest may be zoning out on all this seascape stuff, and I am going to give it a rest soon, and write about something else. But I will return to the subject and do some demos in a couple of weeks. I have to make time to prepare those. I am madly burning the candle at both ends.

Rocks are the other element in seascape. The composition of a seascape is often a designed interplay between the dark rocks and the light sea. The water and sky often function as a single unit . They can be part of the same value area and share a lot of values and colors. Remember back when I was discussing snow painting that I talked about the paper doll idea? It applies here too. If the sea and the sky are in a high value, all of the rocks are laid on top of them, like paper dolls cut from black paper land placed on a light ground. The rocks are essentially silhouetted in front of the water and sky. This isn't always the case but it does happen a lot and seascape painters use this as a design motif. That is another reason why back lighting seascapes is so common.

Here is a photo showing that. All of the rocks are down in a low value, although they do have some lights in them they are all well below the value of the sea. It is easy to lay in the rocks as and interesting series of interlocking darks and then decorate them with some color and value variation to get variety in them. The trick is not to chop them up to much, but keep them unified.

Looking at Waughs work, I believe he often toned his canvas dark at the outset and then painted the water light down onto that, leaving his dark for the rocks. I have experimented some with that and it seems like a good system.

Tuesday, April 6, 2010

One of my own seascapes and some blather.


Above is a 24 x 30 seascape I delivered this week to the Guild of Boston Artists where it won the Frank Benson award. I worked on it till 3:30 in the morning the night before and delivered it wet, about five minutes before the jury showed up.
It looks a little like the seascape demo that I posted a week or two ago as that was a study for this project. I made about 3 or 4 studies before I finished this. I delivered it in such haste that I was unable to photograph it, so I downloaded this from the Guilds e-mail to me. I then photoshopped ( actually photoshop elements ) it to improve the color a little. I find that very difficult. If I had the capability to work red yellow blue when correcting photos I would be very pleased. Do you use a program that allows this?

As I said before, seascape is always sort of experimental for me and I seldom feel like I have a real handle on it. I do think they are getting better though. I have painted as lot of them but they are by far the hardest thing I do. Maybe I am figuring it out, they are getting better. When I paint landscape I feel like I am in my favored element, and although some come out better than others , I feel confident out there. In any event, I will share with you all what I do know.

One of the commenter's asked what I would add to the lovely photos I have been showing to make them into a seascape. Below is a little section of a photo that is all I might use of any particular shot.

I don't find a photograph and make a painted version of it. I design the seascape and then try to wing as much of it as I can, when I get stuck, I look through my photos and try to find one that show a particular effect I need. I will then have to alter that to fit in to my painting. I may have to change the color of that, or redraw it from a slightly different angle etc. My seascapes are not romanticized versions of photographs but instead, are abstract designs based on the appearance of the sea.

Tomorrow I will begin the next element in play in the seascape, the rocks. They are the foil for all that writhing hissing water. The two elements are opposites of one another. I think that is part of why seascapes offer so many great design opportunities.

More about foam and run offs in seascape

Above is another Waugh. Notice the nice cool tonality that pervades the whole piece. Tonal atmosphere like this was referred to by artists of that generation as "envelope". That would be accented like in French, I suppose it was a studio phrase from when so many of these guys and their teachers generation studied in Paris. Waughs father however was an English portrait painter, Waugh emigrated to this country and spent the last years of his life living in Provincetown.I am going to continue writing tonight about some of the things that go on in the foam. This is usually your foreground or middle ground and will often be an important element in a seascape.

Here is some of the same foam detail as in the picture above. In order=m to paint this you will need to understand the whipped cream ropey look of it well enough to invent it. You will never have just the photographic references you need. You need to analyze how it works and be able to conjure it up using form expressed in values.

Here is another Waugh showing one of the important elements of seascape. After the wave crashes over a rock, it spills off. These run offs are beautiful and provide great compositional devices to lock the sea and rocks together, soften the sea's edges and describe shapes.

Here is a photographic example of the same thing. I will do some demos of how to make these passages in paint. But not tonight!

Here is a good shot of water running off a rock, This is excellent raw material for a seascape. Notice how the water runs down revealing the form of the rocks, and then the foreground rock occludes the view giving it depth and recessing the runoff into the middle ground. Again the skill required is to study stuff like this until you can make it up. You need to understand the principles by which it operates to do that. Then you can build patterns out of it. That is what Waugh is up to in those studio paintings above. This is a vocabulary of effects to be arranged over an abstract substructure.

Here is another great run off shot from Gloucester on the Bass Rocks often called the back shore, Generations of seascapist trained and worked their. It is now all private and virtually all is posted. That is one of the reasons I no longer live in Gloucester, Rockport. I moved their partially to paint seascapes and it has become nearly impossible get to the water anymore. Although Halibut point is still good.

Monday, April 5, 2010

The patterns in the foam from a spent wave

Here's another Waugh of that terminal moment when the hammer hits the anvil and shatters into whipped cream. In the foreground is water from the previous wave running off of the rocks. That little passage is the backwash. After the wave breaks, the water returns to the sea in a lot of different ways.

Here is the most common, the foam has collapsed and formed a blanket over the water. Its surface is broken into holes by the movement of the water. Many seascape painters have spent a lot of effort analyzing this effect. Here is a close up of the middle of the above picture.

The holes in the water are separated from and decorated by those stringy lines and thin bands of foam. Painting these holes will reveal the form of the water beneath and establish perspective and movement in your foreground. It is also hard to do well. E. John Robinson, who's book I recommended uses a lot of these effects in his painting. Noted the perspected ovoids with the squared off sides that occur in the foam at this stage. There are also repeated lines in there. The "strings" and borders of the ovoid holes aren't random but trail backwards in the direction of the receding water. The foam around these holes is lumpy and takes light and shadow as its thickness varies.

As the foam recedes into the middle ground it is captured by the next rising swell and carried up its face which stretches those holes even more. Notice in the shot above how the water on the spill of this wave turns opaque as it becomes aerated on the way down. Then it hits the base of the wave and turns to foam. From the top to the bottom of that water there are three stages.
  • The first, at the turn of the form is the color of the seawater and may have a dark edge at its top. Notice the slight "humpyness" that the top displays.
  • The middle stage the falling water is beginning to aerate and goes white or gray as it becomes opaque.
  • The last stage is the violent conversion to foam which bounces and dances on the surface of the undulating sea ahead of the incoming wave. The individual globs of this foam are streamlined back towards their origin. These gobs of foam are in clusters and increase in size from the point of their impact ( in this example to the right ). In some places the foam is more advanced towards the viewer and in some places it has fallen behind. There is usually a firm shadow beneath it.

Sunday, April 4, 2010

Yet more stuff about surf and still no end in sight because I need to do demo posts and somebody did ask for this, I remember.

Above is a wave in the next stage, it has broken along its entire front and is now spent. The whole boiling mass of foam has been displayed and the wave begins to collapse, or better for or artistic purposes, it runs into a rock or headland. When that happens the foam explodes upwards often with a loud bass roar and spray shooting skyward. I call it, the giant puffball. Below is one of those. It too has its own distinctive anatomy. Lets explore that a little.

The spray in the giant puffball has form like anything else. Part of it is in the light and part is not, it also has within it variations caused by some parts of it catching the light and other parts in the shade, These are often relieved against one another like above. This also gives a look of volume. The spray rebounds from the rocks and its top is often carried away by the wind.

This is front lit and that gives definition to the various clumps or ropey shapes in the burst. Portraying this is always a game of sort edges and slightly harder accents. Below is my late friend Charles Vickery. Vickery used to come into my tiny gallery and sit at my easel. He would do little demo paintings for me. He didn't much explain it as he did it though. I took a workshop with him in the mid eighties. He explained a lot then. I wish I could find my notes from that. I know I have them somewhere.

He did seascapes every day for many , many years and got REALLY good at it. I am proud to have known him. This image is from a dealer who handles his work http://www.charlesvickery.com/gallery/

Saturday, April 3, 2010

Rembrandt's crucifixion and more about surf

Rembrandt courtesy of artrenewal.org

Below is the scripture from the book of Mathew;

From the sixth hour until the ninth hour darkness came over all the land. About the ninth hour Jesus cried out in a loud voice, "Eloi, Eloi, lama sabachthani?"—which means, "My God, my God, why have you forsaken me?"When some of those standing there heard this, they said, "He's calling Elijah."Immediately one of them ran and got a sponge. He filled it with wine vinegar, put it on a stick, and offered it to Jesus to drink. The rest said, "Now leave him alone. Let's see if Elijah comes to save him." And when Jesus had cried out again in a loud voice, he gave up his spirit.

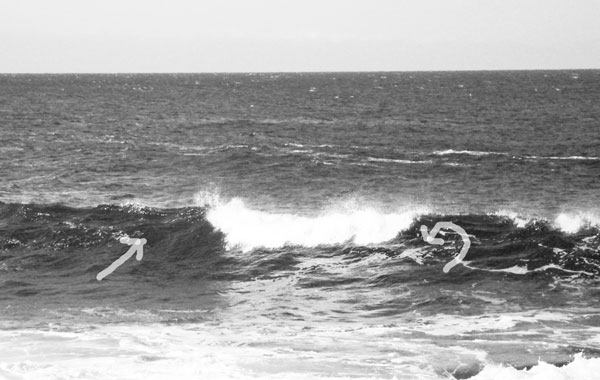
Above is a breaking wave, Last night we look at the beginning of this process, here is the classic view that seascape painters so often paint. The wave has broken, that is, the water from the back of the wave, moving faster than its slowing front wall has rushed over the front and fallen against the face and base of the wave. The water explodes into foam. Look at the left hand break and notice a few things. The water curves down in a semicircle. On that edge as it hits the face of the wave it begins to convert to foam in ever increasing amounts. As more and more water reaches the base of the wave it creates ever larger and often globular masses of foam. Below is a Frederick Waugh ( a devout Christian incidentally ) showing this in paint.

Waughs knowledge of the anatomy and form of the wave makes the anatomy of the breaker clear. It is so much better than the photo. This is an example of the problems encountered by those who try to copy a photo to make a seascape and the limitations of that. Because of the enormous size of the waves Waugh has shown the foam purposefully sliding down the face of the oncoming wave. He has characterized the globs into which the foam erupts to show the shapes that it takes. It looks thick like whipped cream.It has volume and weight. Behind the foam, is the back of the wave driving forward, and to the left behind that, we see the foam that has passed over the back of the advancing wave. Notice how the foam "grows" at the bottom of the semicircle as more and more water cascades down the front of the wave. Waugh has the whole thing backlit, that is something seascape painters love to do. This lighting shows up the form of the wave best, see how the foam is divided into light and shadow, just like on a figure or still life.

The second smaller wave over to the left shows another interesting thing about waves. the water breaking over the front is in an up plane and lives in the world of the light. That's important. That passage will often progress into the shadow on its way to the foam. The broken patterns of the foam from a previous wave are formed as the growing wave stretches it and tears elongated semicircular holes in it as the mass of the water increases. It is still functioning like a skin stretched over the orb of energy below the surface. Unlike the water though, the foam doesn't stretch very well, so it tears into holes and tatters. These foam patterns show the shape and planes of the rising face of the wave.

This is a powerful and extremely original design. It is arrangements like this that make Waugh so extraordinary.

Friday, April 2, 2010

The beginnings of a breaking wave

As a wave nears the shore its bottom begins to be effected by that in several ways. The first is that the orb of energy I described last night is lifted up so that more of it becomes exposed above the surface of the water. The wave "grows" in size because more of it is revealed by the lower level of the water about it's feet.

The second effect from the shallow water is s slowing of the bottom of the moving orb. This causes that orb to lean forward at a greater angle. As the whole system grows unstable the water from the back of the wave beginning to rush over the front. Below is a wave doing that. .

The cascade of water over the top has begun, when it hits the face of the wave it explodes into foam. Here's what that looks like close up.

The back of the wave is visible in this picture, below that the water becomes more aerated and then turns to foam. Below is a diagram of the surface of the water. As I explained last night, most of this water is a skin over the forces below, being stretched more than moved by the force of the rolling orb hidden beneath it. Oh, do do da day!

Thursday, April 1, 2010

The moving orbs of energy beneath the waves


Above is a crude illustration showing how waves are "powered". Far out at sea, wind and tides acting upon the water causes orbs of stored energy to roll beneath its surface. These orbs move below the surface of the water and are elliptically shaped. As they roll forward, the water passes over them like a slippery skin. The orbs don't really carry the water forward but move smoothly beneath it, lifting it as they pass beneath the surface. A toy boat thrown onto the surface of the water will be lifted and then pass over the back of the wave rather than being moved decidedly forward by it.The same happens with the smaller wavelets (called secondarys ) on their surface, which are lifted with the skin of water and then ride up and then over the backs of the waves. In between the rolling orbs are the troughs of the waves.

These orbs lean forward at the top as they move. As these orbs of energy near land and their bottoms touch the sea floor, they lean evermore forward and rise higher in the water. As their bottoms are slowed by the contact with the sea floor their leading edge becomes even further ahead of their bottoms and the water on their backs rushes over their tops as a breaker. More on that next.

Waves out on the open ocean don't break like they do at the shore, but carry the foam on their tops and often pass under it, and leave their crests of foam behind, trailing it down their backs. Out on the open ocean they are often called rollers. Rollers become breakers at the shore in shallow water.

Tuesday, March 30, 2010

Wave anatomy and its importance to the seascape painter in the determination of form in light and the ramifications thereof, plus additional material

Above is a breaker, I shot a lot of them to get one this perfect. It is almost the ideal wave. I am going to begin talking about the anatomy of a wave by referring you to your John Carlson book. It IS the text for this blog, I guess. In the book he talks about the law of consequent angles.
For those of you who don't know about that, it is a system for understanding the values before us in a landscape, depending upon the angle the various planes present to the sky, or light source. Something that sticks up from the ground or surface like a wall, presents no planes to the light and is therefore darkest in value . The surface of the earth or water presents all of itself to the light, like a floor and therefore is high in value. Planes that are slanting upwards like ramps from the "floor" receive more light depending upon their consequent angles to the light. If you have Carlsons book reread the chapter on this again, it will help you through the understanding of that which is to follow in the coming posts.

The technique of painting waves and seascape requires understanding how the surface anatomy turns their form toward or away from the light. A seascape painter uses the anatomical knowledge of how waves are shaped to know which way EVERY plane on their surface is facing. This combined with knowledge from observation of the water itself enables the seascape painter to invent the surf. There are many planes, perhaps dozens in a wave. In order to paint them you need to know which way they are all facing. To make this even more complex, most of them are mirrors.

AS an example, look over at the left hand side of that wave, to the left of the break. There are two major value areas there. They are the upright "wave: forms that rise like walls, and the top planes that "ramp' upwards and reflect the sky. All over the body of the wave and the surface of the water similar planes are doing the same thing, many of them are pointed like mountains, in fact the up planes in a wave tend to resemble mountain ranges. Notice the "floor" in front of the wave, it is of a higher key than the rising planes of the front of the wave and below the foam of the wave it's mirror like quality is displayed. These are the sort of things that I will be discussing in the upcoming posts, as I lay out in a hopefully orderly fashion the structure of the parts of an ideal wave.

I received an e-mail today from the Old Lyme Art Association saying that the lower level of their historic building, containing their studios, has been flooded. The building is close to the Lieutenant river which must be very high. Those of you outside New England may be unaware that we have had, and continue to receive record rainfall amounts. Boston is in a state of emergency with the National Guard called out. I am supposed to deliver a painting for a show at the Guild tomorrow, I hope I can get there.
Reproduced below is their e- mail to me;


Dear Members, Students and Friends,

The Lyme Art Association has suffered significant flood damage from this week's rain, and the downstairs studio will be closed through the week. Any classes scheduled this week are CANCELED unless you hear otherwise from us.

Both downstairs computers have been damaged in the flood. They held important Education databases and class rosters. If you have registered for a class this spring, please help us by calling the LAA between 10am and 5pm and giving us your enrollment information again. Please be patient if you get a busy signal - we only have 2 phone lines.


We will not be able to respond to your emails as our wireless server was also destroyed.

Thank you in advance for your patience and support as we recover from this disaster. Our upstairs galleries did not suffer any water damage and will be open all week.

With kindest regards,

Susan Ballek
Executive Director


Beware of Beaks

Above is a view I shot at Cathedral ledges in Rockport Massachusetts yesterday. Skin divers come here to drown. I lived about a block away from here for several years and they were forever being lost off this shore. I show this view to describe another point of view problem, THE BEAK!

In a verbal description this sounds like a great view, and in a way it is. BUT it has a big problem. That pointy shape of the distance makes for a lousey design. Yes, there are some Hudson river paintings that successfully use beaks, but it is still good to be forewarned.When you paint along the shore you see beaks everywhere. It is possible to finesse a beak in a painting by arranging the water to downplay it, say, with streaks of foam, but generally in seascape painting they are an enemy waiting to pounce on your design. You might get away with one in a show, but a whole roomful of them would be like a cutlery store fired at you from a canon.

The beak above is dangerously symmetrical top and bottom also. Notice also that the shape of the water below repeats that of the beak above. Truly evil! When I painted for years up on the coast of Maine, over and over I would make paintings with beaks in them and then one day I had had it and I swore I would never paint another beak.

Here is a wave I shot the other day at Halibut point, tomorrow I will begin pointing out some of its anatomy.